Sections

Thursday, June 27, 2013

Getting ready for my first shop display!!


Ok, we had our All Girls Craft Day for June last weekend and I said I really wanted to get the blog post written up and posted here... but I've been more distracted in the evenings than I planned getting more clutches sewn to put in Easely Amused's store on MY shelf!! 

Therefore, until I can get the rest of those pics off my camera and edited to post here, I give you clutch pr0n!!


New fabric!! May only be 1 or 2 clutches though... we'll see!
More new fabric!! Can't wait to see these together as a clutch!!


Sexy ladies...?? ;)


I still have about 6 more I want to make along with price tags getting put on these as well as on whatever jewelry I choose to put up in the window. Then I need to figure out displays which I think I'll have to make myself but I kinda want to try and keep with the fact I'm setting up shop in a painting studio. I want to use canvases to display the earrings, necklaces and bracelets, make them almost little pieces of "art" on the canvases and also maybe have a tray with some loose pieces.

The clutches oddly enough are a little harder to figure out because as much as people have suggested to just splay them out in a fan... they'd be laying on the shelf and not visible from across the room. What I would like to do is have them sort of stadium seated, prominently displayed so that they're visible from across the room. I am thinking of using this idea and just making it smaller, with steps that aren't as deep so only 1, maybe 2 clutches fit on each step, and have little lips so they don't just slide off:


The (awesome) DIY can be found at Sen & Sons

I'll keep you guys updated and definitely show you what I come up with and how the shelf looks when I'm all done!! I hope to be ready to take it all down to setup Monday night, 7/1/13, but we'll see how that goes...

Craft ya laters!!

Monday, June 24, 2013

BYOB Paint Classes and First Official Consignment Deal!!

You guys have heard of Groupon, yeah? (If not, it's a service that works with businesses to offer discount buys of services/goods that basically help businesses get noticed or get some easy business to try and retain long-term customers. They provide emails and have deals not just for your city, state but also for vacation trips and more! It's pretty awesome.) Well, my friend got a couple of classes scheduled through Groupon to a BYOB Paint class at a place called Easely Amused here in Austin, TX. If any of you can, I highly suggest making it out to one of their classes sometime. They've only been open for 2 months, but the owner Bridget, is FANTASTIC!! She makes the classes so much fun with little stories, jokes and just her love of what she does!

For these classes, you are allowed to BringYourOwnBeverage (see beer or wine, etc ;) ), you pay the $30-$40 (depending on size) for the art piece you want, and you are provided all the supplies from the canvas to the brushes to the paints. Once the class is over, you get to go home with your very own piece of art that YOU painted. It doesn't matter your skill level when you go, it will turn out however you want it to. The awesome thing is to see the variety that comes out of the same class, with the same instructor and all the different choices people make and ways they paint.


This is pretty much what you start off with: a blank canvas, a plate full of paint colors, water cup for your brushes and whatever brushes deemed necessary by Bridget you'll need for the picture and of course, my choice of beverage for the night was a bottle of Cabernet Savignon.. yummmm!


This is after a few steps of a blue wash on the top 3rd of the canvas, kiwi green on the middle and a darker green on the bottom of the canvas. Then layers of dots from a pumpkin red all over, to a red on the bottom half and a bright orange on the top half.


Here we have Airon deep in thought as she's adding the leaves on her trees.


This is my finished piece, with a few more layers of leaves added on (including some dark reddish brown leaves in the bottom right corner of the foliage) and tree trunks, nice and whispy!!


Airon's showcasing her awesome finished piece! She added the extra white stripes near the trunks in the grassy area and a few holes in the leaves along with adding a pretty cute bird's nest with some robins!!

After the class, I got curious if I could re-create this picture again. Only, I didn't want to do a full-size so I grabbed a 2"x3" miniature canvas from my stock and.....


What do you guys think?? Pretty similar, eh?! Painting in miniature is pretty challenging! I maybe could have added more layers of leaves, but I like the way it looks now!

The next picture we did (we had 2 Groupon sessions) was poppies!! This is the first few steps done:


We did about 5 yellow dots anywhere on the canvas to place our poppies, then made red sort of flower bodies around them. Then we did a light blue wash down the middle and dark blue on the outsides.

Then we did another round of the blue washes to make them darker. This is Airon's (she wanted more than 5 :) :


This one is mine:

The next few steps were to darken and texturize the poppies, add some dark brown and black scribbles in the centers, leaving however much of the yellow we wanted, and then add some lavender and pink to the meeting ground of light and dark blues and added kiwi green stems.


I added a little more texture to the flowers and was done with mine:


Airon added a few more details and stems and such to hers and here is her final piece!!:


All in all, I'd say these classes, if you have a studio near you, are a MUST!!!! If you happen to be in the Austin, TX area, you can find Easely Amused here. You can also take a look through the picture gallery to see the variance of these pieces people have painted!

 It was such an awesome experience, both times and even though it was the same studio and same instructor, the experiences were still different!! It's also pretty awesome to see all the variations on final pieces with the same instructions!!

Now to the more exciting part!!

I showed Bridget about 10-12 pieces of my jewelry and the pink and brown flowered gathered clutch I showed you guys the other day.... SHE LOVED IT ALL!!! She's giving me a whole shelf on a bookshelf that is in her lobby with the backside facing a full wall WINDOW to the outside/street!! I am so excited about this opportunity for consignment and look forward to working with Bridget on this first time endeavor for my business and hobby!!

Now I just have to price everything, make more clutches, figure out displays, layout on the shelf, etc.....

SO EXCITED!!!! I can't wait to setup my shelf and don't worry, I will definitely show you guys what I come up with!

Craft ya laters!!

Tuesday, June 18, 2013

My 2nd Attempt at a Zippered, Gathered Clutch

I decided last night to make another attempt at a zippered, gathered clutch. This time however, I decided to follow the instructions just a liiiiittle bit better. If you recall, the last time I tried making one, it turned out pretty alright, it just didn't have a pocket inside, I didn't do the lining right so you could see the seams on the inside and the strap wasn't quite right (it started fraying pretty bad):


Original post here : My First Zippered Pouch/Wristlet

It was however my first attempt at a gather and only my 2nd ever attempt at a zipper!! I believe it may also have been the first time I put a strap on anything too?

Anywho, last night I decided I should try making something that ISN'T perlers and something that I could maybe actually use! I again pulled up the awesome tutorial over at Noodlehead  and decided to follow the instructions for doing not only the lining properly, but also the band across the front.


For the 1st attempt I did, I folded under the edge of the strip and stitched that down, and THEN attached it to the pouch front. If I'd only read the instructions better, I would have seen that you're supposed to fold the strip over length-wise, stitch, turn inside out and then with the seam in the middle of the underside, you stitch the sides down. This process is much cleaner and much nicer!!


I also pulled out my instruction manual for my sewing machine for the first time ever that I can recall in the 10 or so years I've had it!! I had to look up how to change out to my zipper foot (first time using it and I kinda like it!) and also double-check how to change the tension for the gathering stitch. I don't think I ever realized that it should always be at 4 when I do normal stitching on projects and the process goes much smoother and quicker! D'oh!!

I am so excited I was able to stick some card pockets in here though! I aaaalmost didn't do them but decided at the last minute, why not!!


The only thing with this guy is I got so excited to get the fabric stitched down as close as I could to the zipper, that I kinda went too close to the zipper in a couple parts. I fixed what I could with doing a stitch on top of the fabric at the zipper's edge while pulling it as tight as I could and it helps, but it's still a little hard to not get the fabric stuck in a couple small spots.


All in all, I am really happy with this finished product and I can't wait to make some more!! What do you guys think?!

Craft ya laters!!

Monday, June 17, 2013

Feature #4 for an Artfire Collection!!

Wow!! I can't believe one of my pieces has been featured in ANOTHER Artfire Collection!!


The 3rd piece on the top row is mine!! To see it closer:


It's one of my flameworked beads that I made into a drop using turquoise, green and lavender glass, with dots of blue goldstone as accents that the picture just can't do enough justice to!!

This is awesome you guys!! I get excited anytime my work is not only noticed, but appreciated and shared with like-minded artists!!

Craft ya laters!!

Thursday, June 13, 2013

Tissue Paper Flowers

I have a friend that has asked Airon and myself to help with figuring out wedding decorations for her barn-themed wedding later this year and one of the things we thought of trying out when we were brainstorming the other day were tissue paper flowers!

If you try to google "How to make tissue paper flowers" you will get literally dozens, if not hundreds, of results! The how-tos and variations are EVERYWHERE!!

I decided to try out a few myself however, just very basic ones, to see how long it takes and variations of size and number of sheets of tissue paper. 
First one I did was 2 full sheets of tissue paper, but folded length-wise and cut so that I had 4 pieces of paper to use. I then cut the tips to sharp points and this is what it looked like:

Not bad,... but what about 6 pieces (3 sheets)?? She only had 1 more sheet of yellow, but the bride had 2 sheets of a tannish/pinkish glittery color! Awesome! I really wanted to see what that would look like together! This time however I cut the edges at a curve:


Another view. This one's my personal fave for the day!
Next up was to try a smaller version!! I went ahead and used 6 pieces, but each piece was about half the length as the previous 2 were. I cut the edges as an inverted "V" (to the ^ on the first one) but soon I realized this thing had wayyy too much tissue paper going on! I was having difficulties getting the layers of paper separated to spread out and actually tore the paper in some places where they seemed particularly stuck together... Not the best idea and I think I gave up on the 2nd half's last 2 pieces to split:


Last, I tried a small one again, only I used just 4 pieces. This worked out muuuch better and I did the ^ point again:

Here I just went ahead and took a group picture of all 4 pieces. I definitely like the 2nd attempt the best but we'll see what the bride decides to do!! Either way, I kinda like making tissue paper flowers!!

Craft ya laters!!

Perler Beads - Post 1

I titled this one "Post 1" because since around Halloween 2012, I have been let's say.... mildly addicted with making perler sprites and as I continue to keep making more, this is pretty much only a portion of what I'll eventually get around to doing! This is mostly going to be a picture slideshow, but these are most of the ones I've made since I picked some up in October last year and have added on since. There are a few more I haven't gotten to get good pictures (and even some of these aren't the best, I'm sorry!) but those will be in another post later:

Megaman 1

Sorry for the photoshop, I took 2 pictures for these, one that included the coin, the other included the pipe.  But here we have Mario, a pipe, fire flower, coin and I guess coin box?

Mario flower

These are some pieces I did for my boss at work. We have 2 of the guys from Despicable Me (movie), an owl and  Oscar the Grouch from Sesame Street.

Mario's Hammer Bro

Sonic the Hedgehog 
Megaman 2

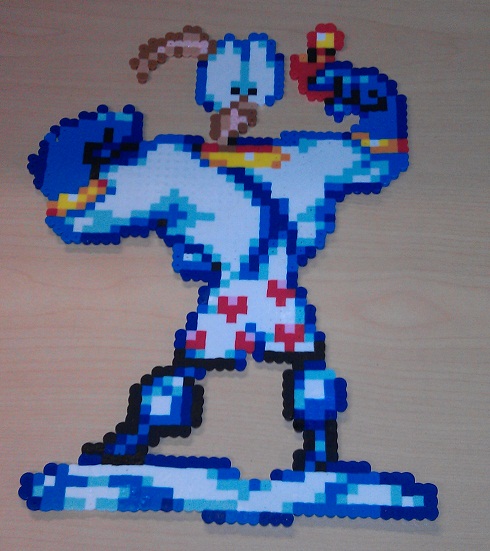
Earthworm Jim

Megaman 3 and Elec Man

Megaman 4.... a LOT of people like and asked for a Megaman!! lol

Cape Mario

Yoshi

Black Mage

Deadpool

Turbo (Wreck It Ralph)

Mario Spring

These are on the wall at my desk at work!! We have Birthday Bear, Bedtime Bear and Cheer Bear!
Donkey Kong Country Bananas
A quick note, I was working on the above bananas (from Donkey Kong Country videogame) and the metal tweezers I was using slipped out of my hand and fell......

I was able to fix it though (obviously) but below is how far I WAS before I dropped the tweezers.... My boyfriend kind of looked at me funny when he heard me whimpering until he saw what happened haha. Note to self, be wayyy more careful while holding tweezers and I REALLY hope I don't do that when I get to some of the bigger projects I have planned!!

I still have quite a few requests I need to get working on, but a lot of what I want to make requires colors I don't have, and neither does Joanns (local supply store that sells the beads by the color, no other local store does). I do believe that Airon, myself and another friend (whom we have awesomely gotten into doing perler beads) are going in on a bulk order from the manufacturer's website. 

I'll try to get pictures of the other pieces I've made that aren't in this post and show you guys what else I've got done, including a picture of our fridge at home as boyfriend painted it orange so it's a cool background, but there's also multiple scenes of magnets going on (see Mario and pipe and flower and coin ;) ).

If any of you are interested, you can check out/follow my Pinterest board: Perler Beads!

Craft ya laters!!