Sections

Showing posts with label displays. Show all posts

Tuesday, October 7, 2014

Craft Show Prep - Miniature Galaxy Art, Daisies, Starry Nights and Display Ideas

I hung out with a friend of mine this last Saturday and we ended up getting some crafting done! I believe I was actually the most product craft-wise in that 4 hours than I have been lately....I really need to work on that one...

Anywho! She's been getting pretty into papercrafting and gave me this piece she'd done before:


And she got this one done while I was there:


I can't wait to see what else she comes up with!

So, what did *I* get done in the 4 hours we were hanging out? Well, I think I mentioned to you guys before about using some mini canvases to re-create a couple of larger art pieces I did at Easely Amused here, but not that I'd been on a huge miniature art kick earlier this year that was the reason behind even having those miniature canvases! 

Those little art canvases are so awesome! You can get in sizes like 2"x2", 2"x3", 3"x3", 2"x4", etc... I'd gone to a local art store and gotten a ton of them because I was seeing online lots of cute things you can do with them! They sold them in packs of 6 and were about $5-$7 a pack. These little things are perfect for use as doll house art pieces, putting on a little trinket shelf, or for me, the appeal is putting on my wall at work since I have a desk job and only so much space to display art and things. 

I also love the miniature canvases because I don't have to be a great artist to get a small piece of art that actually looks pretty awesome! The Starry Night especially is one of those cases where if I tried doing the detail of the tree tops on a bigger canvas, say, 2'x3' or something I would have taken FOREVER and still not felt like I got it just right.

Now, I haven't sprayed these guys in an acrylic gloss sealant but I wanted to show you what I got done. I will show you guys what they look like after I spray them though as they should pop just a tad bit more on the colors, similar to what resin does on the clay pieces I've done.

The whole set.
Galaxies - Top left is 2"x3" and then 2"x2" canvases, bottom row are all 3"x3" pieces.
Daisies - This piece is 2"x4".
Starry Night - This little guy is only a 2"x2"!!
There were a couple of these that I painted what I thought would look good and then completely painted over and started again, but hey, I'm pretty happy with the results! Now I just need to do more!

I was also given an AWEsome suggestion by my bff, Airon, about what other pieces I could do. She suggested I do some sets as Xmas ornaments by doing some wintery/Xmasy themes and putting ribbon on the back to hang them by, and sell them for something like "Any 3 for $12". What do you guys think?

Also, I've been thinking about how to display them and have seen this idea which I think is cute:

Seen here from Two Hand Design blog.

Or maybe something like this:


Seen on Jamie's Home Blog here.
I want to mix the two ideas above and make something that's maybe about 1' wide by 2' high, with a hinge, so really there would be 2 pieces that are each 1'x2' and instead of using 1/2" quarter round for the shelves, I'd use 1/2"x1" quarter round so there's enough space for the canvases to be leaned back.

For the Christmas themed pieces, ornaments and such, I have bought a 2' tall (tabletop type) green fake Christmas tree so I can display the ornaments on that. I'd be able to use a clip and put a yellow paper star on the top, and that could be my price sign!

Craft ya laters!!

Thursday, July 25, 2013

First Consignment Display - Easely Amused


Last night, I went down to Easely Amused so that I could (finally) get my displays setup to try to sell in Bridget's shop for my consignment deal. I was so nervous that when I got there and started taking my displays and pieces out of my bag, I was shaking and probably talking too fast and even dropped things 3 times!! I was just so nervous about how she would react to my displays along with just the fact that I was finally getting a professional display in a local shop!!

That slowly eased however as each item I pulled out of my bag, whether it was actual merchandise or display, she loved! She ooh'd at my colorful clutches, she aah'd at my jewelry, she wow'd at my clutch display and she 'neat!'d my single necklace displays I painted. 

I'm not sure exactly what I expected, but I was very excited when she seemed to appreciate every little detail I'd been so particular about and had taken the time to do! From the hot glue on the back of the jewelry boards so she didn't poke herself handling them, to the butterflies I punched and used as my price tags, from the printed out inventory sheet we both got a copy of, to the bags I provided for her to put jewelry or clutches that were sold in with a business card in each one already!

Needless to say, I'm very happy I took the time to make it look as nice as I could as I'm sure if she loved it, anyone else who sees it should like how I set it all up too... right??

If anyone's in the Austin, TX area and likes painting or just having a good time with friends, you should totally check out Easely Amused on South Lamar:


Well, you tell me what you think, yeah? :)


Entire display as I left it and what it will stay for at least a week.

Close-up of bracelet and necklace display using painted art canvas flat board on a wooden art display easel.
Clutch display with the handmade display risers and business cards in their little holder.

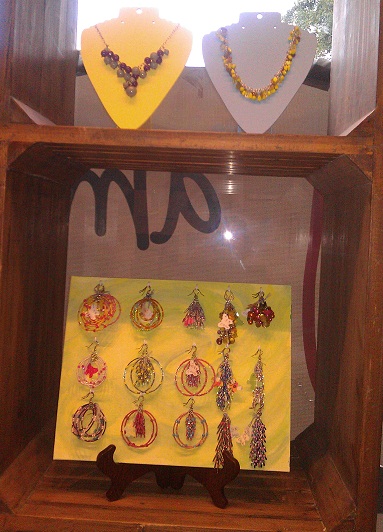
Close-up of earring display using painted art canvas flat board on a wooden art display easel.

Main row I'd originally planned for with the exception of shelf change altogether.

Close-up of the colors I painted the single necklace displays.

I used a couple of wrought-iron looking single art display easels for these two.

Far left with necklaces, bracelets and 2 single piece displays above.

Middle display with all my clutches in the shop at the time.

Far right with earrings and 2 single piece displays above.
Card design I ended up going with and printed 230 of. I am plenty stocked!
The single displays before I pained the 3 layers of paint on front along with the paper bags with handles for bagging a sold clutch and chevron paper bags for jewelry sales. The flat canvas boards came in a set of 3 for about $8 and the 2 easel stands I got sitting next to them. The paper pack on the far left is what I used to punch my price tags for the jewelry and clutches as opposed to using those little pre-strung tags or using stickers.
What the canvas boards look like without jewelry and hooks covering. I completely forgot until I got there that her lobby furniture is about the yellow I used as the base layer!! I just got 1/4" screw hooks to screw into the board for hanging jewelry and where the screws stuck out the back, I just hot glued over and did a solid layer of green on the back to cover the print they come with.
For the clutch display, I used the basic idea from Senn & Sons:
I used a LOT of hot glue to make sure all the pieces stayed and were as sturdy as I could get them.

I added a lip to the front so hopefully it would keep a clutch (maybe 2?) from just sliding off the 'shelf'.
I added a bracer piece in the back to give it more stability. The only thing I might change would be adding a base so if I used this type of display at an outdoor show, I can put little beanbags in the bottom to keep it from knocking over.
My first attempt at covering didn't quite work out with some gray cotton... You can see the hot glue lines really easily and it looked bad, worse in person than in the picture.

Found some awesome soft fleece material I never used for its intended project and had enough to cover the front...

...cover the sides with adding a little folded flourish for aesthetics...

...and put a panel in the back to cover the hot glue and hide the secret of how I made this!! Also, this would be visible from the window side and I didn't want it to look messy!
 Well, there you have it. My displays and the entire setup!! What do you guys think?! I took so many pictures because I was just so darn excited about having a public setup that I maybe took too many pictures, but hey, gotta document my progress, right?? I wish I could have taken window pictures of how they'll look from the street, but her sign was up and I didn't want to take off too much of the duct tape she was using to keep it on out there. Maybe I can get some pictures next time I show up.

I'm pretty excited about the change of shelving though and the fact that she hasn't found vendors to fill the other shelves. That means I can at least put another couple clutches at the top of my display (the other shelves were only 15" tall and 4 clutches are 16" tall...) along with maybe making more displays for other pieces to put on the 2nd shelf, at least, until she finds other vendors to showcase. I told Bridget that I was looking into making tablet cases and clutches with a detachable wrist strap and a 2nd whole-side pocket so that you could put your phone or bigger items on the other side in the clutches and she seemed as excited as I am, so those may be next on the plan!!

Now I get to take a break tonight for a show bf and I are going to with friends and then I get back to work tomorrow on the last few clutches I cut fabric for last month and start planning what I want to do with the rest of the fabric I've bought since then. I also need to figure out what I want to put up in a friend's dojo who's going to make a shadowbox display box and I get half of it, 18"x36"!! I've also been advised to check out another local store about 15 minutes from my day job's location that does consignment of local vendors to see if I can setup a consignment deal with them too!! I will definitely keep you guys posted though!!

Craft ya laters!

Monday, July 22, 2013

Monthly All Girls Craft Group - July 2013

This month's craft day was small due to a lot of stuff going on for people. Airon had homework and projects to do for her classes, Michelle's working on getting their house ready to show/sell and lots of other types of things.

We did have one though, even if it was just my mom, Sarah and me. 

Sarah was working on some cross-stitch type Kleenex boxes and a jeans casing for her chain link belt she wears when she takes walks to encourage a little more cardio burn (didn't get pictures unfortunately).

My mom wanted to make another badge lanyard for herself:


The only part I did for her was to finish it off with a crimp bead, thread protector and crimp cover! Looks good!!

I haven't been able to get all my displays done and pricing and all that for my consignment deal yet so that's what I was working on some more. I got the rest of my price tags strung (punched cardstock with a couple of punches I have, will show you guys those later ;) ) but also painted the single necklace displays:


I had painted a couple of flat canvases yellow and then swirled green and blue on the background to add a little flair and measured out and drilled holes for the hooks sometime last week. Saturday I went ahead and got all the screw hooks in the boards and hung the jewelry I plan on giving her on them:


Once I get my whole setup done, I will show you guys the finished products as well as what the display looks like all setup in the Easely Amused shop! 

I can't wait to finish these guys and get to the next item(s) on my list!!
This was definitely a smaller group this time around, but it meant that we got to sit there and chit chat the whole time. 

Here's to next time!!

Craft ya laters!