Sections

Thursday, December 13, 2012

Butterfly Paint Chip Art

I know there's dozens of versions of paint chip art out there, but it is pretty easy, cheap and can be made into so many different kinds of art! You can just cut random shapes out or you could use craft punches to make uniform shapes and arrange them into your art of choice. I decided to do a few pieces and have finished 2 so far that I will show you today.

**Disclaimer - My pictures are of poor quality, I know... I wasn't sure where my camera was so you'll have to suffer through my phone's camera pictures. Also, I've found it's pretty darn hard to get purples photographed either way and think this time it wasn't so bad!**

My boss loves purple. I'm not so sure about butterflies, that's probably more me than her, but I decided to give it a go to make a piece and see if she likes it. So I grabbed a bunch of different color purple paint chip samples:


 I went ahead and started cutting out the strips to use for my craft punches:

My awesome little tiny butterfly punch! It had a catch-all lid on the bottom, but I removed it as it was an easy hinge and would keep flopping down and couldn't hold more than 3 or 4 butterflies without them trying to get stuck in the punch's body itself!!

On the far right is my awesome 3-in-1 butterfly punch I got with a coupon. It can cut a basic butterfly, a butterfly with just the dots along the wings, and lastly, it can do butterflies with the dots and the inner wings cut-out. Love this punch!! It is pretty messy though, but very easy to switch between butterfly punch choices, to actually punch and of course, both punches are easy-lock shut.


I wasn't using regular canvases as I only have a few and just wanted to make a few smaller pieces that are easier to put up on our desk cube walls. I used a flat canvas that's about 8 1/2" x 11" that I had 2 3-packs of. So far, that means no cost as the paint chips were free, already had the canvases, the punches and the paint to paint the canvas silver:

Nothing too special...


The thing that I don't really see in many posts where other people are doing this paint chip art is how freaking hard it is to get the design you're wanting juuuuuust right! I had a heck of a time deciding exactly how to do this since I didn't want to cover the whole canvas!

Arrangement one...

Arrangement two....

Arrangement three....
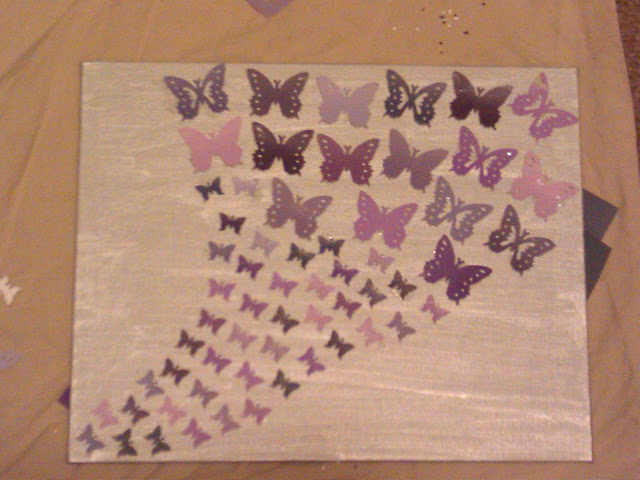
Needless to say, I tried a few different ways to put these things on here and was bothering my bff as she was hanging out with some schoolmates at a bar by texting her the various arrangements for her opinion. After sending her these 3 and maybe a couple more options, we settled on:


Her suggestion was to make them look more funneled from the bottom left corner to the top right. I was happy with this one and so I went ahead and glued them down. I used just a liquid glue stick thingie (my school glue sticks were apparently so old, they were dried out and looked like worms in their tubes... worms that didn't want to do anything but roll over and die :( I was sad...)

But there you have it!! What do you guys think?! I painted a second canvas with leftover silver paint since I realized I squeezed way too much on the first canvas, so there's a possibility of doing another one of these, especially since as soon as I was done and stood up, I spotted another butterfly punch I completely forgot I had (I've had it for about 10 years!) and it's a middle size between these two, just plain solid butterfly punch... I might try to do another version of this piece, maybe with the butterflies coming from middle bottom and splitting off to the sides? Lemme think on it and get back to ya'll.....

Also, wanted to share another piece I did as well in a similar fashion, only larger so that it's 16" x 24" or so:


I know, the other projects mostly cover a canvas as opposed to the whole thing, but I got a little cut-happy and made so many petals that I didn't want to NOT use them! And besides, I like it! :) That's all that matters, right? This one, I glued the pieces down, but then covered in a few layers of mod podge just to make sure none come up. I'm tempted to seal in resin later, and if I do, I will show you guys better pictures for one, and second, will show you guys the before and after!!

Til next time...........


Thursday, December 6, 2012

Making Candles From Scratch

I got momentarily interested in making my own candles some months ago, well, I've gotten interested before, but not enough to spend about $100 on supplies to make candles! So I went with my mom (who was also interested, but more for re-using partials she's had for years and basically re-fashioning them) to our local Hobby Lobby (heretofore - HobLob) and spent probably 45 mins to an hour perusing all the different supplies they had there. I ended up with 1" and 3" wicks (we were tempted to get the wooden ones, but decided those could be for later, like holidays later), a 10lb slab of parafin wax, some random votive and tealight holders to put the wax into, a 6-pack of scents, 3 color dyes, stearic acid, a book and a candy thermometer. Then I went to the local Walmart and got a cheapie $15 double-boiler set of pots.

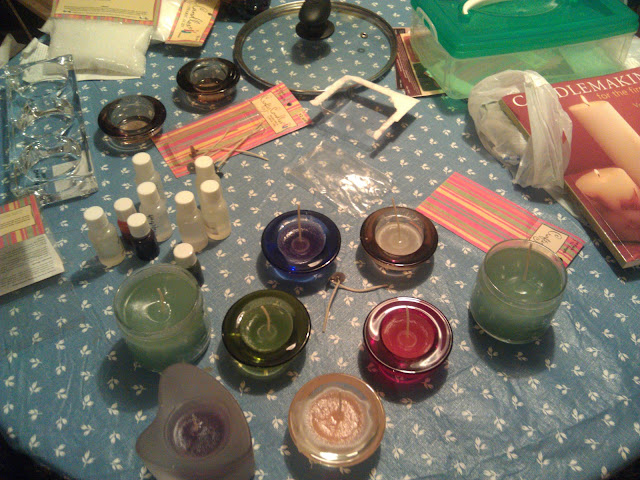
After spending that much, I was ready to get home and get to cooking! I briefly glanced through the book I got as I was too excited to do TOO much research first, and really only went for what temperature the wax should get up to for our particular type of candles/holders. We then proceeded to make some easy little candles in glass holders that would otherwise be for tea lights and maybe a few random jars she had lying around. The results:


Close-up of 2 tealights and 1 of the jars.

My attempt at more of an artistic view lol
 Now, it's maybe hard to tell, but in the first picture, you can kind of see where in the 2 green jar candles, there's a dip (the ring around the wick). I have since learned that this is what normally happens to wax when it cools down and constricts. This is fixed by keeping just a tad bit of wax still in the pot, so that when the wax is cool enough and has dipped, you pour that last little bit of wax in there and it's fixed! (I only just recently learned that part.)

We tried doing color dyes to match the holders, and then whatever colors for the clear holders and that worked out pretty good, except I couldn't get the brown figured out so we didn't dye it.

That attempt was so long ago, and I've had the supplies just sitting in my closet since then, not to see the light of day again... until I pulled them out last night!! Yay!! Welcome back my pretties!!

I was really more interested in an attempt at making my own scent this time. I have this incense that I LOVE! But..... bf can't really do burning incense because of his allergies... lame. So I wanted to see if I could take this incense:


Just scrape off the powder on the sticks...


I put the powder with some olive oil  in that little white container with the red lid (top left in above picture, yay 5-hour energies!!) and when I realized that after about 9 or 10 sticks, it still smelled like oil (boo), I went ahead and added a few drops of the vanilla scent to supplement. Then I went on to the wax, since it was warm enough (between 170°F and 200°F), I added my colors (I tried for brown this time by mixing all 3 colors got brown, just wish it was a little darker) and poured into the glasses! I also have dips in these too, which I was going to fix, but after what I thought would have been long enough for them to do this and they hadn't, I thought I was ok! I was wrong :(


The best part is that I forgot to put the scented oil in the wax while on the stove, and so poured it in the candle glasses AFTER I'd poured the wax and it had a couple minutes to start cooling! Whoops!! See that little level of almost black in the above picture, at the bottom of the candle? Yeah, that's the darn incense's black powder, even after I tried mixing it in!


The last candle I did, it's hard to tell why I took a picture but I poured a LOT of my scented, home-made oil in the wax while still on the stove. It had so much of the incense powder that even though I had dyes to turn the wax brown, this turned it almost black!! I also didn't have enough wax to fill the holder as this was only the wax that would have fixed the dips in the last 2! Teeheehee?

The only real big difference this time that I did and didn't do last time (because we were anxious to see what would happen without and to just make candles without instructions) was that I added stearic acid in these guys. Stearic acid is supposed to help the candle in lasting longer, holding the color better, the scents longer and make it more opaque I think? I burned all 3 last night and they at least seemed to not burn down nearly as quick as the big green ones from the 1st attempt with my mom, but was unable to get the smell as we were also cooking a turkey, and this was too overpowering. I will try burning them again a couple more times to see if I can even smell my incense or just the vanilla I added in... If I can't, I think I'll try to look up ways to make my own oil again and try another method. That is unless anyone out there has any tips? Pointers? Help!?

Next time I think I want to try making dipped pillars or something, and I will try to get better pictures with more of a step-by-step to show you guys. One of these days, I want to have bf make me or help me make my own one of these : 


So that I can make candles like this!!:


 YAY GOALS!!!