Sections

Showing posts with label candles. Show all posts

Friday, January 11, 2013

The Monthly Craft Challenge!!

I've seen this type of idea on other people's blogs where they have a weekly or a monthly challenge that they invite others to join in on. This can include people that already have those supplies, or maybe have to go out and get supplies so they can participate.

For me, I already have a ton of supplies just not getting used. I feel more like a Jackie of all trades, master of none. My goals in doing this challenge is to attempt to become more of a master at the crafts and hobbies I have delved in. My supplies currently are stored away in their boxes or drawers, wasting away, and that just makes me sad! The following should give you an idea of what all I have: 

Clay - clay, pasta roller, blades, carving tools, toaster oven, bead baking rack with pins, pearl ex powders, cutters:

Resin - clear resin (2pks), white resin (1 pk), tons of glitter, mylar flakes, transparent and opaque color dyes, molds, mold release


Candles - double boiler, thermometer, 3 color dyes, 6-pk scents, wicks, 10lb slab of wax, stearic acid, vybar:


Beads - seed, large seed, bicones, wood, glass, crystals, shells, cubes, colored wires, fireline thread, memory wire, jump rings, head/eye pins, earring hooks, clasps:

Scrapbooking - stickers, more stickers, gel pens, stamps, 4 pairs of edging scissors, mod podge glue, mod podge dimensional magic(to compare to resin), papers (singles and pads), ribbon:

Embossing - powders, resist ink, embossing ink pad, heat gun


Sewing and String Crafts - yarn, embroidery thread, spools, needles, crochet hooks, sewing machine, tons of fabric, patterns:


This isn't even all of the supplies I have, but it is a majority. I've been collecting supplies, as well as hobbies to go along with them, since before I was in High School. As such, I've clearly amassed a collection worthy of 5 crafters at least!

To try and whittle this stock of supplies down into actual items, I will attempt to challenge myself monthly with making things using the supplies I currently have, with only buying new things if it's something like more sewing thread mid-purse, or more yarn to finish the latch hook I'm doing, etc.

I'd like to try and do this all year,
but let's see how long I can keep this up. Is there anyone else out there with a massive supply stock that wants to join me?? Or even if  you don't have a supply list like I do to choose from, is there anyone that wants to challenge themselves to either learn new methods of crafting and use the challenge to hone those skills, or even just get better at skills you already have? Let me know in the comments!

Thursday, December 6, 2012

Making Candles From Scratch

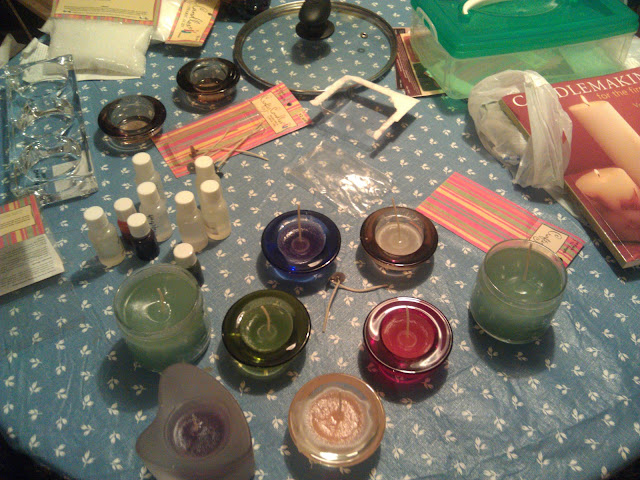
I got momentarily interested in making my own candles some months ago, well, I've gotten interested before, but not enough to spend about $100 on supplies to make candles! So I went with my mom (who was also interested, but more for re-using partials she's had for years and basically re-fashioning them) to our local Hobby Lobby (heretofore - HobLob) and spent probably 45 mins to an hour perusing all the different supplies they had there. I ended up with 1" and 3" wicks (we were tempted to get the wooden ones, but decided those could be for later, like holidays later), a 10lb slab of parafin wax, some random votive and tealight holders to put the wax into, a 6-pack of scents, 3 color dyes, stearic acid, a book and a candy thermometer. Then I went to the local Walmart and got a cheapie $15 double-boiler set of pots.

After spending that much, I was ready to get home and get to cooking! I briefly glanced through the book I got as I was too excited to do TOO much research first, and really only went for what temperature the wax should get up to for our particular type of candles/holders. We then proceeded to make some easy little candles in glass holders that would otherwise be for tea lights and maybe a few random jars she had lying around. The results:


Close-up of 2 tealights and 1 of the jars.

My attempt at more of an artistic view lol
 Now, it's maybe hard to tell, but in the first picture, you can kind of see where in the 2 green jar candles, there's a dip (the ring around the wick). I have since learned that this is what normally happens to wax when it cools down and constricts. This is fixed by keeping just a tad bit of wax still in the pot, so that when the wax is cool enough and has dipped, you pour that last little bit of wax in there and it's fixed! (I only just recently learned that part.)

We tried doing color dyes to match the holders, and then whatever colors for the clear holders and that worked out pretty good, except I couldn't get the brown figured out so we didn't dye it.

That attempt was so long ago, and I've had the supplies just sitting in my closet since then, not to see the light of day again... until I pulled them out last night!! Yay!! Welcome back my pretties!!

I was really more interested in an attempt at making my own scent this time. I have this incense that I LOVE! But..... bf can't really do burning incense because of his allergies... lame. So I wanted to see if I could take this incense:


Just scrape off the powder on the sticks...


I put the powder with some olive oil  in that little white container with the red lid (top left in above picture, yay 5-hour energies!!) and when I realized that after about 9 or 10 sticks, it still smelled like oil (boo), I went ahead and added a few drops of the vanilla scent to supplement. Then I went on to the wax, since it was warm enough (between 170°F and 200°F), I added my colors (I tried for brown this time by mixing all 3 colors got brown, just wish it was a little darker) and poured into the glasses! I also have dips in these too, which I was going to fix, but after what I thought would have been long enough for them to do this and they hadn't, I thought I was ok! I was wrong :(


The best part is that I forgot to put the scented oil in the wax while on the stove, and so poured it in the candle glasses AFTER I'd poured the wax and it had a couple minutes to start cooling! Whoops!! See that little level of almost black in the above picture, at the bottom of the candle? Yeah, that's the darn incense's black powder, even after I tried mixing it in!


The last candle I did, it's hard to tell why I took a picture but I poured a LOT of my scented, home-made oil in the wax while still on the stove. It had so much of the incense powder that even though I had dyes to turn the wax brown, this turned it almost black!! I also didn't have enough wax to fill the holder as this was only the wax that would have fixed the dips in the last 2! Teeheehee?

The only real big difference this time that I did and didn't do last time (because we were anxious to see what would happen without and to just make candles without instructions) was that I added stearic acid in these guys. Stearic acid is supposed to help the candle in lasting longer, holding the color better, the scents longer and make it more opaque I think? I burned all 3 last night and they at least seemed to not burn down nearly as quick as the big green ones from the 1st attempt with my mom, but was unable to get the smell as we were also cooking a turkey, and this was too overpowering. I will try burning them again a couple more times to see if I can even smell my incense or just the vanilla I added in... If I can't, I think I'll try to look up ways to make my own oil again and try another method. That is unless anyone out there has any tips? Pointers? Help!?

Next time I think I want to try making dipped pillars or something, and I will try to get better pictures with more of a step-by-step to show you guys. One of these days, I want to have bf make me or help me make my own one of these : 


So that I can make candles like this!!:


 YAY GOALS!!!


Wednesday, November 14, 2012

Halloween and my obsession with DIY decorations - Pt 2 - 2012

In this post, I will show you some of the awesome ideas I found and tried for my Halloween party/decorations for 2012. 

First of all, chain! Those plastic chains you can get at the store for about $5-$10 for maybe a few feet? Psshaww!! That's what I have to say!! The reason being is that it is SO easy to make  your own!! Now, it may not have all the details the plastic chain would, but you can always add your own details later!! The site I used for reference was : Tutorials: Easy Chain Pipe Insulation


And voila!! a 6' tube of pipe insulation = 12.5' of homemade chain!!! Once done, you can just add a slight spray of a light gray paint or even black to texture it up, and you're good to go!


Next on the list? Dripping candles!! Fake, mind you, but awesome dripping candles that you can reuse each year!! Reference? How-to: Making a Faux Dripping Candelabra

I didn't actually use the instructions though, just the idea, so mine didn't turn out quite like I wanted. They still look pretty awesome though IMHO and there's always next year to make them better!!


Grab yourself a PVC pipe (I used a 3" diameter by 6' for about $7.50) and a Miter Saw to cut them

Glue gun (with very old sticks apparently that ended up more yellow than clear!)

Spray paint white to cover the yellowed glue and the blue lettering on the sides of the pipes

Add bases the candles can sit on

Yay fake candles!!


I was actually too paranoid to light these for my Halloween party however as bf was worried if anyone knocked them enough, the styrofoam would go up in flames!! When I fix these up next year, I'm going to try and adjust what the candles are sitting on more like the original post and also maybe find clear glue sticks (see: new) and make them a bit more drippy. Thing is, I can totally see using these guys throughout the rest of the year also!! Red and green for Xmas, brown, orange and gold for the fall/Thanksgiving, pastels for Easter? I might have to try these out as well as maybe different ways to create easy bases/insides so you don't have to worry about lighting them and will let you guys know how all that turns out!


Next on the list? Bats!! And instead of just buying the plastic bats to put on the wall, here's an idea: cut out of paper and put on the wall AND string from the ceiling!! Reference : Flight of the Bats


Tried getting a good perspective shot.

And another.

Closer-up of the bats.

And re-used some of the bats for Halloween night on the wall to our front door.

My bf is the one who cut out all the bats, free-hand no less!! I couldn't believe how good these guys turned out and yes, I'm so jealous he can do that!!! And they only cost me about $5 for the 50-pk of black cardstock, some fishing line and a handful of clear push pins! He adapted the handle of a broom with a socket that the pushpin could sit in with the metal part sticking out, I would reach up and just pop those suckers in the ceiling! The other end of the handle with the loop isn't perfect, but it works in catching the edge of the pins later to get them back down again!

Something easier you can get the kids to help with is Finger Weaving! My brother taught me how to do this when I was younger but a reference for anyone who doesn't know what I'm talking about or how to do it: How to Finger Knit


I mixed orange and black at the same time. A little harder to do the knitting, but you get used to it.

Works like a charm for using as a type of garland!!
It may not be shiny, but if you only spend the $4 or so each on black and orange yarn, you can easily get many yards of garland to use as you wish!! I wasn't able to measure exactly how long these skeins got me, but the ball when I wrapped it all up was about 7"-8" in diameter!! I only used about a 1/3rd to do this decoration, and saved the rest for next year. 

I'm going to go ahead and wrap up part 2 as this is getting long, and there's still a few more things I wanna show you guys plus the reveal for the full effect later!! 

Craft ya laters!!