Sections

Showing posts with label craft. Show all posts

Monday, December 30, 2019

Great Wave Off Kanagawa - Cross Stitch - Pt 2 / FP

In my catching up, I found I never did share with you all the Finished Project (FP) of the Great Wave Off Kanagawa cross stitch piece I did for my brother!!

Well, I have plenty of pictures along the way, but I unfortunately don't recall the amount of time it took to finish, so please don't hate me, but please do enjoy the FP!!

So here's where we left off with the 1st half...


Next, to work on quadrant 3 which is like, 99% taupe... uuuugh.....


The taupe.... it just keeps going!!!........


Alright!! Done with Q3!!

Note to self though: Don't ever use pencil again in a pinch when I can't find my disappearing ink pen to mark my grid... **siigh** Hubby says it's not as noticeable to him as it is to me, so I'll just have to finish at this point, and if it doesn't wash out when I'm done, well, fingers crossed my brother doesn't really notice, either!


Waaaaait a minute.....


Aww crud!!


Ok, so I couldn't tell at home, but taking this project with me to the bar we frequent, that has a patio, where I can stitch outdoors in the natural light of the sun... 

I used the wrong white in Q3 than I used in Q1 and Q2!!! DARNIT!! I haaate frogging!


But frog I did, and got back to work.......

**********************************************************************

Working hard, or hardly working.... eh?? 😉😁

This is my setup at work on a few lunch hours at this point...once I fixed the wrong white!!


Halfway done with Q4! I can just TASTE the finish line!! 


Almost there.......


Sooooo cloooose.......


Aaaaaaand... done!! Ain't that purty?!


That's a pretty clean back, too, if I don't say so myself!!


W00t!! So glad that's done!!

......Now on to the next project! LOL


Craft ya lataz!!

Monday, July 1, 2013

Monthly All Girls Craft Group - June 2013

We had our June All Girls Craft Day on 6/22/13. It was a little small with attendance being 5 gals, one of whom couldn't stay long, but we still got a bit done!

Sarah was able to get a bracelet and 2 pairs of earrings done (one pair pictured, the other with black beads instead of blue):


Anne had a little more fun with the needle felting and made an awesomely cute little duck!!


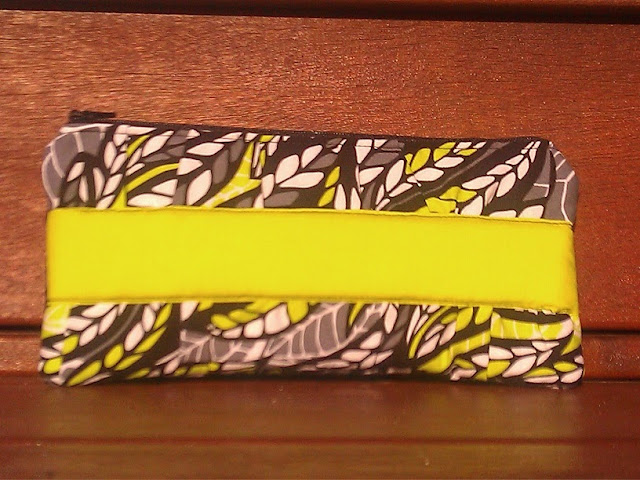
I got another clutch done for a friend at work, but unfortunately the neon green was unexpected and has asked for another one with a darker, more true green. That's ok, that just means I can use this one for my consignment shop stock!


And last but not least, we had Airon taking her first big stab and making something on a sewing machine (whirrrrr):

And voila! She made the cutest little bow-front, zippered, wrist strap clutch!! 


Great job as always all!!

Craft ya laters!!

Thursday, June 27, 2013

Getting ready for my first shop display!!


Ok, we had our All Girls Craft Day for June last weekend and I said I really wanted to get the blog post written up and posted here... but I've been more distracted in the evenings than I planned getting more clutches sewn to put in Easely Amused's store on MY shelf!! 

Therefore, until I can get the rest of those pics off my camera and edited to post here, I give you clutch pr0n!!


New fabric!! May only be 1 or 2 clutches though... we'll see!
More new fabric!! Can't wait to see these together as a clutch!!


Sexy ladies...?? ;)


I still have about 6 more I want to make along with price tags getting put on these as well as on whatever jewelry I choose to put up in the window. Then I need to figure out displays which I think I'll have to make myself but I kinda want to try and keep with the fact I'm setting up shop in a painting studio. I want to use canvases to display the earrings, necklaces and bracelets, make them almost little pieces of "art" on the canvases and also maybe have a tray with some loose pieces.

The clutches oddly enough are a little harder to figure out because as much as people have suggested to just splay them out in a fan... they'd be laying on the shelf and not visible from across the room. What I would like to do is have them sort of stadium seated, prominently displayed so that they're visible from across the room. I am thinking of using this idea and just making it smaller, with steps that aren't as deep so only 1, maybe 2 clutches fit on each step, and have little lips so they don't just slide off:


The (awesome) DIY can be found at Sen & Sons

I'll keep you guys updated and definitely show you what I come up with and how the shelf looks when I'm all done!! I hope to be ready to take it all down to setup Monday night, 7/1/13, but we'll see how that goes...

Craft ya laters!!

Thursday, May 9, 2013

Painted and Mod Podged Work Tray - Pt 1

I keep not wanting to work in my craft room on projects and opt instead to work in the living room, on the coffee table, so that I can watch tv, eat and spend time with my bf. This unfortunately sometimes results in my projects perhaps spending much more time than they should out and making a mess.

My solution? I'm going to get one of those trays with handles that I can just put my things in and pick up easy enough to take to my room to put away! Except I don't like spending $20-$30 on one when it might possibly get mussed up by my projects on occasion.... Solution!

I went to my local Hobby Lobby and got one of these bad boys for $3.49!! What a bargain!!

I went ahead and painted the whole thing using a mixture of a brick red, pumpkin orange and gold squirted on the wood, and mixed as I was painting with my sponge brush:


I already had some scrapbooking paper on hand (which is actually why I chose the colors I did, otherwise, it would have been blue ;) ) and used about 3 layers of mod podge on the paper, and 2 on the rest of the tray. 


You like the paper?? The sides of the tray aren't too rough with the multiple layers of mod podge as i lightly sanded in between layers.

The one thing I did very poorly though was to not actually measure the dimensions of the tray and paper; I free-handed the fitting and cutting process and the result?
 

Yeah, there was a gap... :( The best I could do at the time was put another piece of paper underneath the main one to sort of hide, but I'm not too happy with the way this looks so I will be trying to come up with a way to hide that before finishing this tray... I will be mixing a 3rd medium into this baby!! Check back later!!

Craft ya laters!!

Tuesday, May 7, 2013

Monthly All Girls Craft Group - April 2013

Hey guys! We actually had a pretty mild Craft Day in April as it seems it's just the 4 of us regularly showing with the exception of 1 guest along with my mom visiting for a couple hours, but not to make anything. I did get pictures of what we did get done however so...


First of all, this is a polymer clay brooch/hair-pin piece Michelle made to test the viability of use for bridesmaids in a wedding. The green is only tissue paper to hold up the petals during baking so imagine those gone, and the in center is a black button pressed in there.... Pretty awesome, don't you think?! We thought so!! Can't wait to see if she kept with this idea and made more! ;)


Leena was able to make a couple of pieces of jewelry I believe (pics to come soon!) but spent most of her time being an awesome hostess!!

Airon and I apparently decided it was time for more perler bead pieces!!

Mine

Airon's.. and no, the 'A' isn't for her, it's for a friend who's an Atlanta Braves fan :p

I know this isn't much to show for you guys, but it was a short and simple craft day for us. May's Craft Day should have a bit more going for it as attendance sounds much better this time (darn school and kid's schedules! :p)

Craft ya laters!!

Monday, January 28, 2013

The Monthly Challenge - January Continued

I am still working on finishing my loom knitted scarves for January's:


I will show you guys scarves #4-#6 now, but I still have more ideas and I still have 4 more days to see how many more I can do!!!!

First off,  I finally finished that green scarf with the gold stripe!! YAYYY!!!!

What do you guys think?!?! Isn't it awesome!? Thing is, as much as I love how this one turned out, I either won't do another like it, or I'll just maybe have money for it next time... lol

Next up, I made another turquoise blue with fringe as the boss of the recipient of the last one wanted one so they could be twinsies! lol:

I love doing that single e-weave pattern cuz it's soooo easy and soooo fast!!


Next up, one I made for myself so that I can maybe wear it under my motorcycle jacket and keep my neck warm on those darn cold mornings:


I've had this yarn for a few years now and just didn't know what to do with it.....until now!! I just LOVE the way the rainbow colors are laced into the green, don't you?! I didn't use the full loom as it's 12 pegs on each side since I only had so much, so I'm really glad I made it only using the inner 8 because that's the only way I got it long enough to actually matter!!

Now, I know I promised a sort of how-to on making the green/gold striped scarf, but I went ahead and least took pictures to give you a good idea of how I did it. If you have done any loom knitting, or possibly just any knitting or crocheting in the first place, you'll probably understand better, but hopefully if not, the pictures at least give you some sort of idea on how I conceived the pattern:

The above picture shows you what it looks like before you start a row. The middle shows the first part of the gold weaving, doing a double e-weave wrap and then the 3rd picture shows the next step which is to wrap the gold around the middle two peg pairs to get a double layer only on those middle 2 pairs of pegs.

Next, I wrapped the green around using the double e-weave, wrapping the first and last gold pegs and crossing over the gold in the meantime. Lastly, I wrapped the green around the loom again, only, I skipped any gold pegs and only got the double layer on the green only pegs. Once you have 2 strands on each peg, you can loop the yarn over the pegs, push them down, and on to the next row!! To start and end the whole scarf, I just did 2 rows of green only, doubling up on all pegs using the double e-weave pattern.

Ever have one of those things you're trying to figure out how to do, or do better? You think and think and think, and you just cannot think of a good way to do it... then one day, BAM! You finally think of something that'll totally work! This was one of those things. When cutting pieces of yarn for fringe, it seemed a little hard to measure to match one piece, or guesstimate and then trim after. I decided I wanted to use a ruler last night but since I couldn't find any.... I grabbed a 3-hole punch that has about 9 inches marked off, put a piece of masking tape on the floor and just marked off increments of how long I wanted the fringe. This made cutting the fringe pieces soooo much easier, and I barely had to trim one little group of fringe after wards! w00t!


Alright guys! That's scarves #4-#6!! Later this week I hope to show you at least 2-4 more that I've done to complete my challenge for this month!! I want to use a gorgeous chocolate brown and gold I got of the Simply Soft - Caron yarn to do 2 different scarves; one with vertical stripes where the gold and brown overlap in the middle and the other with horizontal stripes between the 2 colors all the way through. I also want to maybe try and make a scarf with a gray and cobalt blue yarn and try something like a zig zag throughout the length...?? Either that or I'll just attempt to make a few cowl scarves with buttons to close them.

Craft ya later!!