Sections

Showing posts with label decorations. Show all posts

Wednesday, July 24, 2013

Looking forward to Halloween 2013!!


It's only July, but yes, I am already getting super excited for projects to work on for this year's Halloween decorations!! I have been scouring Pinterest, joined The Halloween Forum, have been checking out Halloween online websites to see what props and decorations are for sale to see what I can try to mimic, etc.

You guys want to see what I'm looking at so far?? Of course you do!!


So those were my PVC pipe candles last year but this time around, I'll be doing some more in other types of color combinations and maybe fix these guys as well as getting the battery powered tealights:


I'm not sure which ones I'll try, or maybe both... but I didn't really think of doing anything but just white last year!! Did you guys know there are COLORED hot glue sticks?! ^_^

I also failed at doing a paper mache hand and copy of a styrofoam head I have....


Not only did I over water down the glue, but I was also only starting with aluminum foil and the wire fingers weren't sticking into the foil (even with super glue/hot glue) so.... a total fail. This year however I want to get significantly better at paper mache so that I can properly do the styrofoam head copies as well as maybe a few of these:

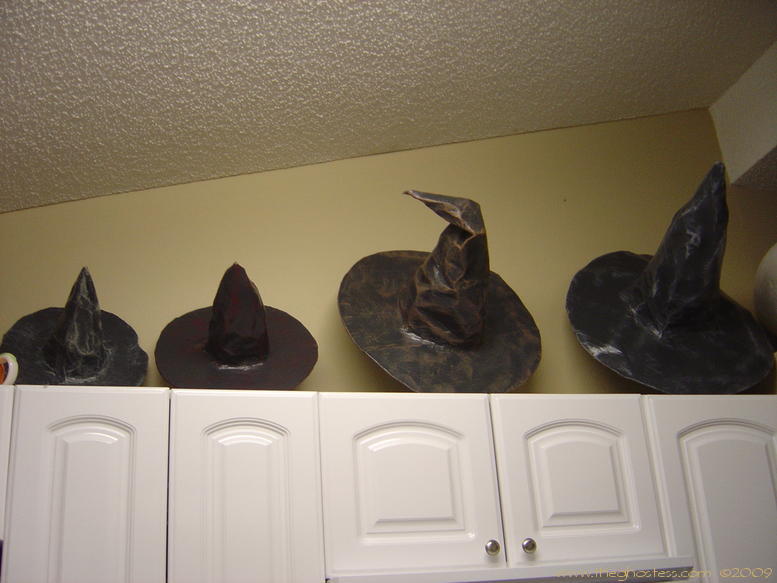
Photo and idea courtesy the Ghosthess
I also want to do a Halloween themed piƱata but want to surprise you guys with that one if I manage to do it right! ;)

I want to get a skull and try to make a mold of it like this:

Awesome tutorial for these here


I also need to get some cheap dolls of all kinds for this kinda stuff:

Wiggler Zombie Baby® PropBrain Eata Zombie Baby® PropBaby in a jar....awesome haha

You get the idea.... lol The first two pictures are from Spirit Halloween's website and the 3rd is from what else, the Halloween forum!

I've also got a good idea of how to make a giant spider, some new ghouls and more!! The Halloweenforum.com is a GREAT resource for all things Halloween and a very supportive, friendly bunch if you want to check it out and get some ideas!

I'm so excited!!!! What about you guys? Any of you got any big Halloween plans starting to brew in the noggin?? Please share in the comments!!

Also, before I forget, tomorrow I'll have a post to show you guys what I ended up doing for my display at Easely Amused, a BYOB Paint Class Shop in my town that I'm doing a consignment deal with!! I'm going down there tonight to set it all up and I am SOOO excited!! Check back then!

Craft ya laters!!

Friday, November 16, 2012

Halloween 2012 - The Big Reveal and Pics!!

Here you have it!! The final product of all the work I put in to Halloween for 2012!!


Yet another ghoul I got done and up.... Don't ask how I got him up there without a ladder though, it included a stool.. on top of a chair.... and yeahhh.... surprisingly stable, but will (try) not to do again!


There was fishing line hanging across the doorway to the mini-hall for the bathroom that people had to walk under to get to the bathroom....Hanging fishing line makes for invisible creepies when you're least expecting it!
Welcome to my spooky village.....


It was also my bff's birthday party and thank goodness she had a blast! ;)


I just HAD to have a friend make this for me!! Even though I don't really eat guacamole.... shhhh!!


These are the only pumpkins carved for the contest I tried to do! :(
Hopefully next year's entries will be more plentiful!!! **fingers crossed!!**
Jello shot brain and skeleton heads and fingers!! Yum!!!

 Last but not least, me!! I attempted to be the infamous Elizabeth Bathory, and using my great grandma's dress, a corset that matched and some fake blood....


Unfortunately, since the corset is a real one, with double german steel boning and the fact that I'd been going non-stop that day (had a contest that morning for a group called Toastmasters first thing that day and wasn't prepared for a late start, late end and still had to finish food prep) and had little to eat, I could only keep the dress and corset on for a few hours. Somehow, the idea of getting a really good shot of my whole outfit before taking it off just did NOT occur to me!! :'( But you get the general idea....

Well guys, there you have it!! My Halloween decorations and party for 2012! Lemme know what you think in the comments!!


Thursday, November 15, 2012

Halloween and my obsession with DIY decorations - Pt 3 - 2012

For the final installation of my Halloween 2012 DIY decorations posts, I will begin with a PVC pipe ghoul! Reference: Making a standing ghoul

My ghoul!! A bit of chain, an old cape used for Renn Faire and the pvc pipe frame! Creepy, no?

I didn't get a chance to make hands, but people seemed to like him as-is. Next year though I plan on getting this guy hands so he can be properly shackled up! ;)

Next, a really simple creepy mirror! Reference: Spooky Mirror


For mine, I used a mirror my friend let me borrow and since I didn't wanna mess it up, I put a layer of crinkled up foil, spray painted it black, taped on the image above, added some web and voila!! It looked a little creepier when you walked by though since it was in a half-hallway through the front door of our house, but a few people did say it creeped them out!

Next, we have spiders!! Tons of them!! Coming out of the fireplace!! This one has no reference as I cam up with it all by my awesome self! ;)


I wanted to make my own spider web and spider but wasn't able to do so due to time constraints and a lot of day job business going on :( The web would have been a braided white yarn with some sort of frame and the spider I was thinking black yarn finger knitted for the legs, and maybe balloons and/or papier mache'd body parts. People seemed to be sufficiently creeped by this alone however, so I called it a success!

The spiders were stuck on the wall with just a little ball of tacky putty and the spider is one of those posable cardboard ones you can get pretty cheap usually. Tape that guy up, make it look like she's crawling down the wall, using the picture frame and curtain rods for footholds, tape and pin up a bunch of fake webbing...done!!

Something small I tried doing that didn't turn out quite like I wanted, again, time constraints.. a Pet Cemetary of sorts. No reference, but here's the picture showing what I did:

Front of the house, Halloween night.
This is more a picture of the front of the house and most of what I did for Halloween night, but we set the 'gravestones' out in my garden. The 'gravestones' were made with little boxes a friend got ahold of real cheap in bulk, about the size of the USPS $5 flat rate boxes that I painted gray and then put names on. I didn't get to put little stories on them, but I had Dolly 1, Dolly 2, Flipper, Seymour (from Futurama), Hooch (Turner and Hooch, movie with Tom Hanks), Cujo (of course!), Grundy (from the DC Comics Universe, a zombie supervillain but bf said he's considered more of a pet so.. **shrug**) and lastly, Old Yeller lol. Spread some webbing on the bushes, strung the cheapie little bag ghosts from the trees, set out the pvc ghoul on the tree and there ya go!

The last thing of real notice I wanted to show is a creepy, cheap village you can put on your counter! Reference: DIY Dollar Store Halloween Village


General haul when I went shopping one day. The porcelain villages are what I'm trying to point out in this one.
Example of the people I got to use.
All laid out, ready to paint!
Spray painted a layer on front and back to cover everything up with some black paint, including the little trees!

After spray painting, including an awesome wire tree I got at the Goodwill for just $1!!
My creepy village all laid out on the bar. I found some black scrap fabric, taped it down, and got some webbing and spray adhesive to spread it out. Then I just set the houses, trees and people around and boom! Spooky Dollar Store Village! I think all this only cost me $11!!
I'll go ahead and end here and next post will be the big reveal and all the pictures I've got from that night!! I wish I had more, but C'est La Vie......

Wednesday, November 14, 2012

Halloween and my obsession with DIY decorations - Pt 2 - 2012

In this post, I will show you some of the awesome ideas I found and tried for my Halloween party/decorations for 2012. 

First of all, chain! Those plastic chains you can get at the store for about $5-$10 for maybe a few feet? Psshaww!! That's what I have to say!! The reason being is that it is SO easy to make  your own!! Now, it may not have all the details the plastic chain would, but you can always add your own details later!! The site I used for reference was : Tutorials: Easy Chain Pipe Insulation


And voila!! a 6' tube of pipe insulation = 12.5' of homemade chain!!! Once done, you can just add a slight spray of a light gray paint or even black to texture it up, and you're good to go!


Next on the list? Dripping candles!! Fake, mind you, but awesome dripping candles that you can reuse each year!! Reference? How-to: Making a Faux Dripping Candelabra

I didn't actually use the instructions though, just the idea, so mine didn't turn out quite like I wanted. They still look pretty awesome though IMHO and there's always next year to make them better!!


Grab yourself a PVC pipe (I used a 3" diameter by 6' for about $7.50) and a Miter Saw to cut them

Glue gun (with very old sticks apparently that ended up more yellow than clear!)

Spray paint white to cover the yellowed glue and the blue lettering on the sides of the pipes

Add bases the candles can sit on

Yay fake candles!!


I was actually too paranoid to light these for my Halloween party however as bf was worried if anyone knocked them enough, the styrofoam would go up in flames!! When I fix these up next year, I'm going to try and adjust what the candles are sitting on more like the original post and also maybe find clear glue sticks (see: new) and make them a bit more drippy. Thing is, I can totally see using these guys throughout the rest of the year also!! Red and green for Xmas, brown, orange and gold for the fall/Thanksgiving, pastels for Easter? I might have to try these out as well as maybe different ways to create easy bases/insides so you don't have to worry about lighting them and will let you guys know how all that turns out!


Next on the list? Bats!! And instead of just buying the plastic bats to put on the wall, here's an idea: cut out of paper and put on the wall AND string from the ceiling!! Reference : Flight of the Bats


Tried getting a good perspective shot.

And another.

Closer-up of the bats.

And re-used some of the bats for Halloween night on the wall to our front door.

My bf is the one who cut out all the bats, free-hand no less!! I couldn't believe how good these guys turned out and yes, I'm so jealous he can do that!!! And they only cost me about $5 for the 50-pk of black cardstock, some fishing line and a handful of clear push pins! He adapted the handle of a broom with a socket that the pushpin could sit in with the metal part sticking out, I would reach up and just pop those suckers in the ceiling! The other end of the handle with the loop isn't perfect, but it works in catching the edge of the pins later to get them back down again!

Something easier you can get the kids to help with is Finger Weaving! My brother taught me how to do this when I was younger but a reference for anyone who doesn't know what I'm talking about or how to do it: How to Finger Knit


I mixed orange and black at the same time. A little harder to do the knitting, but you get used to it.

Works like a charm for using as a type of garland!!
It may not be shiny, but if you only spend the $4 or so each on black and orange yarn, you can easily get many yards of garland to use as you wish!! I wasn't able to measure exactly how long these skeins got me, but the ball when I wrapped it all up was about 7"-8" in diameter!! I only used about a 1/3rd to do this decoration, and saved the rest for next year. 

I'm going to go ahead and wrap up part 2 as this is getting long, and there's still a few more things I wanna show you guys plus the reveal for the full effect later!! 

Craft ya laters!!