Sections

Showing posts with label fabric. Show all posts

Thursday, November 24, 2016

Storing Fabric Ideas - Mini Bolts!

I know we go to the store and usually buy fabric, take it home, and until we use it, it's stored...in a drawer, or just on a shelf, yes? Well, for a lot of us, that's maybe what happens, and if you've read my blog for any extended period of time, you remember when I've shown you the large 3-drawer sterilite containers I keep my fabric in, shown here.

Raise your hand if you know of all the "wonderful" sales that Jo-Anns tends to have, all year round, but particularly during holiday times? (All of you I'm sure should have your hands raised at this point....lol)

Well, last Xmas season, when Snuggle Flannel went on sale, I maaaaaaaaaaaaay have gone a bit crazy with buying a bunch of different kinds, in 2 yard increments where possible, to make either scarves for friends for Xmas presents.

I ended up not getting to make them as soon after, I lost my job and was super stressed out, but I still have the flannel, and have yet to decide what to do with it!

I didn't have room to put the fabric in my drawers, so I decided to put to use a bunch of chipboard sheets a friend gave me, and.....

Tada!! Mini-bolts of my flannel that tells me what I have on each!!

Here's some of the flannel I bought:


And here's how I did the bolts with labels on what the fabric is and how much of each I have in stock!

What do you guys think?


For the time being, since I don't have much in the ways of shelving in my room, below is a little shelf with some of these bolts. It's not perfect, and particularly not as clean on the rest of it as I'd like, but hey, it's a start! 


Thoughts? How do you store your fabric?? I'd love to hear in the comments section!

Side-note, is anyone interested in a pair of flannel pajama pants, or maybe a comfy pair of shorts to wear around the house?? Just reach out to me and we can make it work! :D

Craft ya laters!

Tuesday, January 21, 2014

New Fabric for January!

I went shopping the other night for new fabric, not like I need more mind you, but I wanted more! I figured with Spring coming up though, I wanted some bright, colorful prints. It seems however that my BFF Airon and I had turquoise and coral on the mind...


See?! With the one exception of course of this last pairing, the others are pretty much turquoise and coral. This was not planned, but hey, it will be interesting to see how they all mix with each other on whatever designs I use them for, right??


I can't wait to get working on these, and some of the older fabric, and show you guys what I come up with!! I have already found new patterns and ideas to try and am excited to see them and even learn a few new techniques in sewing along the way! :D

Craft ya laters!!

Monday, August 5, 2013

New Fabric For August

I love August if for nothing else than my day job having 3 paychecks this month due to timing! As soon as this last week had started, I was planning on going to the store on Saturday to get more fabric. I am pretty pleased with what I got to work with, what about you?

This one might seem odd, but there's a totally valid explanation. No, it's not getting used for a tablet case or clutch or anything. It's most likely going to be used for a zippered pouch armband for a friend who is a fellow motorcycle rider like myself, but has a TX toll device that he'd prefer to wear in a pouch on his arm than store in his backpack or case on his bike. There will be more on this later...


I actually ended up getting a lot of this floral as when the cutting lady was undoing the fabric on the bolt, she saw that there was only 1 1/3 yd left on the bolt. They hate doing remnant packaging so they offer to give you an awesome discount on what's left if you'll just take it with your cut!

This blue floral I think would go nicely with this silver polka dot I got the other day.....

...or as a real simple pairing with black.

I personally really love this fabric and can't wait to see it made into a clutch and/or case!!


Just another variation idea to pair these together instead of just with black.


So what do you guys think? I really like these fabrics and can't wait to get to work on them. I only have to get some zippers ordered from a seller on Etsy (Zipit) that stocks YKK brand zippers at a fantastic price and I'm excited to get good brand zippers, en masse, that will match the fabric I'm using much better than the Coats & Clark ones I've had to get locally at Joanns. 

I believe I already have someone interested in the blue/silver fabric paired with the blue it's pictured with for a banded clutch, and maybe even a similar tablet case pairing!!

Keep an eye out for what's next!!

Craft ya laters!!

Wednesday, January 30, 2013

Sneak Peek At February!!

You guys wanna see a sneak peek at what's to come in February? Of course you do!! Well, I went to Hancock Fabrics this weekend as they were having a big Blowout Sale - up to 50% on select items!! I scored a bunch of fabric that I have plans for already, whaddya think of the colors and designs?:


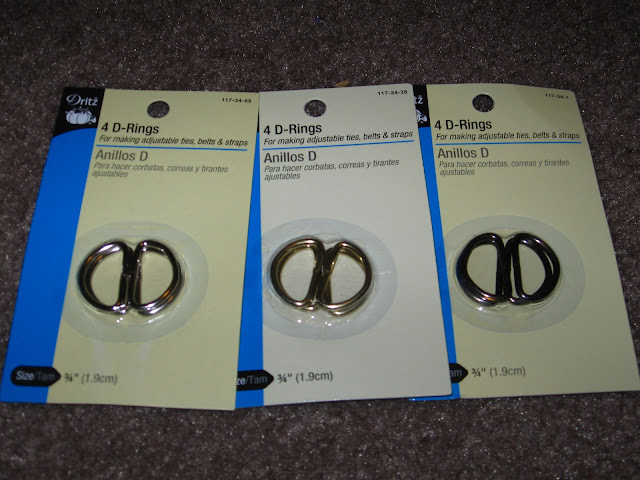
I also got some D-rings so that I can make detachable handles/straps on the purses and clutches I want to work on for February:

Speaking of, here are some ideas of things I might work on/tweak to my liking to get things made to post in my store:


I hope you guys are excited for February! I know I am!! I can't wait to get started on getting some awesome things made with all that awesome pretty new fabric!!

Craft ya later!

Tuesday, January 15, 2013

DIY Sewn Handwarmers - Tutorial

I, like many people right now probably, have been suffering from cold hands!! It's cold out there you guys!! Now, we may not be getting snow here in Texas, but being in the low 30s is still pretty darn cold for me, especially when I'm wearing my 4 layers on a regular basis....

Anywho, I decided I wanted to try and make my own little handwarmersjust like this fine lady over here that made handwarmers look like owls, NatashaGoes, only I wanted to make some of my own as a basic first try in squares.

***************************************************************************************
Difficulty level: Beginner + 1 (Basic sewing machine skills needed)
Time needed: ~ 30 minutes or less (based on skill/experience) 
Supplies needed: fabric - enough for 4 5"x5" squares, matching thread, sewing machine, pins, scissors, rice, funnel, measuring cup/spoon, template and/or ruler 
***************************************************************************************

I chose fleece I had in my fabric drawers in a white and lavender purple:

The yellow square is a piece of cardstock I have from a pack that measures about 4.25" x 5" that I used for a basic template:

Next, I pinned a purple and white together, right sides together:

Then under the needle we go! I used just a basic straight stitch at medium tension and length; these won't be something to wear nor fiercely handled. Note that I have not started at an edge nor in the middle, but closer to one side right past the middle. This is so once I get back around to this side on the other corner, I can stop sewing to leave a gap:

See the gap? I've stuck my seam ripper in there so you guys can see it properly:

Here we have both pairs of pieces sewn together: 

And now we flip them inside out. Through the gap you left earlier, push through a corner from the bottom and carefully pull the entire thing in on itself. Be careful not to rip the seams you made by sewing the pieces together in the first place:

The last bit of edges can be pushed out by sticking your finger in and poking in the corners. If you can't get your finger in there, use a small stick like a chopstick, pen, pencil, etc:

Once you do this to both, they should look about like this:

Next you need to gather your rice, funnel and measuring cup/spoon: 

For these small warmers, I only needed about 1/4cup of rice:

Funnel goes in the hole in your warmers, and the rice in the funnel:

You don't want to fill the whole bag to bursting at the seams, but you'll want to make sure it's mostly full:

Last step! All you have to do now is fold the edges under to match the seams you sewed previously and go under the sewing machine!!

Real quick note; make sure you put your foot down. I was so excited to get these done and distracted by the fabric being so darn thick in there, that I couldn't figure out why the heck it kept getting stuck!! Then I realized, when I reached back there to lift the foot up and get it all out to investigate.....the foot was never put down in the first place on this step!! Funny thing is, I did it right on the first one, this just happened on the second one:

Oh well, at least it's an easy fix!! Just open the door, get the bobbin out, and cut all those strings.

Well, there you have it!! you now have 2 awesomely soft handwarmers!! You can see where that external stitch shut was, but it's no biggie. This is about how professional cornhole bags look anyways:

I nuked one in the microwave for about 30 seconds and when I opened the microwave door, I could almost smell the burnt/cooked rice. Hmmm...... I took it out and it almost felt wet, like there was steam making the outside wet? Also, it didn't stay warm longer than about 20 or so minutes. 

I guess it's back to the drawing board? That is, unless I only need these guys to stay warm for about 20 minutes, which isn't that big a deal, but I want to try other fabrics as well as other sizes. I want to make one to put around your neck and see how well that works out. That and I want to try out making one cold and see how long it stays that way!

One thing's for sure, I had fun making these as they're very simple, and worst case scenario? I can make 2 more and now it's a set of cornhole bags for a kid's hands! :)