Sections

Showing posts with label canvas. Show all posts

Monday, June 24, 2013

BYOB Paint Classes and First Official Consignment Deal!!

You guys have heard of Groupon, yeah? (If not, it's a service that works with businesses to offer discount buys of services/goods that basically help businesses get noticed or get some easy business to try and retain long-term customers. They provide emails and have deals not just for your city, state but also for vacation trips and more! It's pretty awesome.) Well, my friend got a couple of classes scheduled through Groupon to a BYOB Paint class at a place called Easely Amused here in Austin, TX. If any of you can, I highly suggest making it out to one of their classes sometime. They've only been open for 2 months, but the owner Bridget, is FANTASTIC!! She makes the classes so much fun with little stories, jokes and just her love of what she does!

For these classes, you are allowed to BringYourOwnBeverage (see beer or wine, etc ;) ), you pay the $30-$40 (depending on size) for the art piece you want, and you are provided all the supplies from the canvas to the brushes to the paints. Once the class is over, you get to go home with your very own piece of art that YOU painted. It doesn't matter your skill level when you go, it will turn out however you want it to. The awesome thing is to see the variety that comes out of the same class, with the same instructor and all the different choices people make and ways they paint.


This is pretty much what you start off with: a blank canvas, a plate full of paint colors, water cup for your brushes and whatever brushes deemed necessary by Bridget you'll need for the picture and of course, my choice of beverage for the night was a bottle of Cabernet Savignon.. yummmm!


This is after a few steps of a blue wash on the top 3rd of the canvas, kiwi green on the middle and a darker green on the bottom of the canvas. Then layers of dots from a pumpkin red all over, to a red on the bottom half and a bright orange on the top half.


Here we have Airon deep in thought as she's adding the leaves on her trees.


This is my finished piece, with a few more layers of leaves added on (including some dark reddish brown leaves in the bottom right corner of the foliage) and tree trunks, nice and whispy!!


Airon's showcasing her awesome finished piece! She added the extra white stripes near the trunks in the grassy area and a few holes in the leaves along with adding a pretty cute bird's nest with some robins!!

After the class, I got curious if I could re-create this picture again. Only, I didn't want to do a full-size so I grabbed a 2"x3" miniature canvas from my stock and.....


What do you guys think?? Pretty similar, eh?! Painting in miniature is pretty challenging! I maybe could have added more layers of leaves, but I like the way it looks now!

The next picture we did (we had 2 Groupon sessions) was poppies!! This is the first few steps done:


We did about 5 yellow dots anywhere on the canvas to place our poppies, then made red sort of flower bodies around them. Then we did a light blue wash down the middle and dark blue on the outsides.

Then we did another round of the blue washes to make them darker. This is Airon's (she wanted more than 5 :) :


This one is mine:

The next few steps were to darken and texturize the poppies, add some dark brown and black scribbles in the centers, leaving however much of the yellow we wanted, and then add some lavender and pink to the meeting ground of light and dark blues and added kiwi green stems.


I added a little more texture to the flowers and was done with mine:


Airon added a few more details and stems and such to hers and here is her final piece!!:


All in all, I'd say these classes, if you have a studio near you, are a MUST!!!! If you happen to be in the Austin, TX area, you can find Easely Amused here. You can also take a look through the picture gallery to see the variance of these pieces people have painted!

 It was such an awesome experience, both times and even though it was the same studio and same instructor, the experiences were still different!! It's also pretty awesome to see all the variations on final pieces with the same instructions!!

Now to the more exciting part!!

I showed Bridget about 10-12 pieces of my jewelry and the pink and brown flowered gathered clutch I showed you guys the other day.... SHE LOVED IT ALL!!! She's giving me a whole shelf on a bookshelf that is in her lobby with the backside facing a full wall WINDOW to the outside/street!! I am so excited about this opportunity for consignment and look forward to working with Bridget on this first time endeavor for my business and hobby!!

Now I just have to price everything, make more clutches, figure out displays, layout on the shelf, etc.....

SO EXCITED!!!! I can't wait to setup my shelf and don't worry, I will definitely show you guys what I come up with!

Craft ya laters!!

Thursday, December 13, 2012

Butterfly Paint Chip Art

I know there's dozens of versions of paint chip art out there, but it is pretty easy, cheap and can be made into so many different kinds of art! You can just cut random shapes out or you could use craft punches to make uniform shapes and arrange them into your art of choice. I decided to do a few pieces and have finished 2 so far that I will show you today.

**Disclaimer - My pictures are of poor quality, I know... I wasn't sure where my camera was so you'll have to suffer through my phone's camera pictures. Also, I've found it's pretty darn hard to get purples photographed either way and think this time it wasn't so bad!**

My boss loves purple. I'm not so sure about butterflies, that's probably more me than her, but I decided to give it a go to make a piece and see if she likes it. So I grabbed a bunch of different color purple paint chip samples:


 I went ahead and started cutting out the strips to use for my craft punches:

My awesome little tiny butterfly punch! It had a catch-all lid on the bottom, but I removed it as it was an easy hinge and would keep flopping down and couldn't hold more than 3 or 4 butterflies without them trying to get stuck in the punch's body itself!!

On the far right is my awesome 3-in-1 butterfly punch I got with a coupon. It can cut a basic butterfly, a butterfly with just the dots along the wings, and lastly, it can do butterflies with the dots and the inner wings cut-out. Love this punch!! It is pretty messy though, but very easy to switch between butterfly punch choices, to actually punch and of course, both punches are easy-lock shut.


I wasn't using regular canvases as I only have a few and just wanted to make a few smaller pieces that are easier to put up on our desk cube walls. I used a flat canvas that's about 8 1/2" x 11" that I had 2 3-packs of. So far, that means no cost as the paint chips were free, already had the canvases, the punches and the paint to paint the canvas silver:

Nothing too special...


The thing that I don't really see in many posts where other people are doing this paint chip art is how freaking hard it is to get the design you're wanting juuuuuust right! I had a heck of a time deciding exactly how to do this since I didn't want to cover the whole canvas!

Arrangement one...

Arrangement two....

Arrangement three....
Needless to say, I tried a few different ways to put these things on here and was bothering my bff as she was hanging out with some schoolmates at a bar by texting her the various arrangements for her opinion. After sending her these 3 and maybe a couple more options, we settled on:


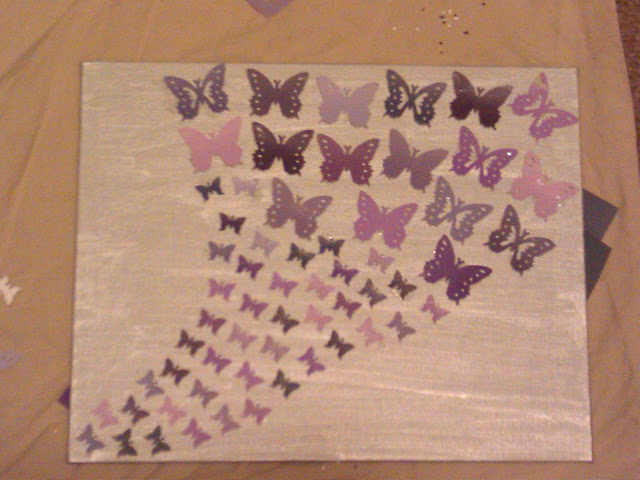
Her suggestion was to make them look more funneled from the bottom left corner to the top right. I was happy with this one and so I went ahead and glued them down. I used just a liquid glue stick thingie (my school glue sticks were apparently so old, they were dried out and looked like worms in their tubes... worms that didn't want to do anything but roll over and die :( I was sad...)

But there you have it!! What do you guys think?! I painted a second canvas with leftover silver paint since I realized I squeezed way too much on the first canvas, so there's a possibility of doing another one of these, especially since as soon as I was done and stood up, I spotted another butterfly punch I completely forgot I had (I've had it for about 10 years!) and it's a middle size between these two, just plain solid butterfly punch... I might try to do another version of this piece, maybe with the butterflies coming from middle bottom and splitting off to the sides? Lemme think on it and get back to ya'll.....

Also, wanted to share another piece I did as well in a similar fashion, only larger so that it's 16" x 24" or so:


I know, the other projects mostly cover a canvas as opposed to the whole thing, but I got a little cut-happy and made so many petals that I didn't want to NOT use them! And besides, I like it! :) That's all that matters, right? This one, I glued the pieces down, but then covered in a few layers of mod podge just to make sure none come up. I'm tempted to seal in resin later, and if I do, I will show you guys better pictures for one, and second, will show you guys the before and after!!

Til next time...........