Sections

Showing posts with label butterfly. Show all posts

Monday, April 21, 2014

First Time Wood-Burning, Otherwise Known as Pyrography

From Wikipedia: Pyrography or pyrogravure is the art of decorating wood or other materials with burn marks resulting from the controlled application of a heated object such as a poker. It is also known as pokerwork or wood burning.
The term means "writing with fire", from the Greek pur (fire) and graphos (writing).[1] It can be practiced using specialized modern pyrography tools, or using a metal implement heated in a fire, or even sunlight concentrated with a magnifying lens.

My friend Michelle recently received a wood burning kit as a present. We weren't able to see her for February Craft Day (will post later), but I was able to hang out with her last weekend. After catching up, and showing her the quilling stuff I'd been working on and the books and awesomeness that is quilling, she showed me what she's done with her wood burning kit!

Then she handed me the tool, the extra tips that came with it, and a couple pieces of wood:


The one on the right she free-handedly drew for me and I traced, then added just a little extra (the dots and the thinner line around the inner level of petals) and the one on the left is one I free-handed myself, without drawing first, following a picture of a mendhi design I found online.

I was having a little difficulty on the flower but I think what I realized was that I was trying to really burn divots/lines into the wood, when really, you're just burning the surface, making shades of color based on how long the hot tip is on the wood, but just scarring the surface. I got a little better at not trying to get into the wood on the butterfly, but had already sorta taught myself the habit first. Oh well, after I get my own kit and a book or two, I'll practice a little and see what else I can come up with.

One thing Michelle and I talked about was designs that we couldn't free-hand ourselves. I mean, how DO you get the image on the wood to draw/trace!? I looked it up with my handy, dandy, Google skills and found this nifty tutorial:

http://www.instructables.com/id/Pyrography-or-How-to-Wood-Burn-Art/

He shows you how to use graphite paper to trace the image from a printout to the wood, and then how to fix if you get marks on the wood you don't want to be there!! 

I've also created a Pinterest board here if anyone's interested in seeing some of the ideas I've found.

I also want to maybe try to paint the butterfly and lotus piece, see what happens if I use watercolors. I've seen where people have used felt tip markers, acrylics, things like that... but not sure if I've seen anyone using watercolors. If I decide to do it and not just leave it as-is, I'll make sure to show you guys!!

So yeah... I'm hooked! lol I've already told boyfriend I want a kit and sent him links to a well-rated starter book, a kit and extra tips that include some stamp-like bits!!

SE WP28 28-Piece Wood burning - Hand Tool Sets - Amazon.com

Don't those look fun!?

Anywho, maybe for my birthday he'll get me the kit... if I don't get it for myself first from being too anxious to get to playing!! ;)

Craft ya laters!!

Wednesday, June 12, 2013

Monthly All Girls Craft Group - May 2013

Again, a little late on this since we had May's craft day on 5/18/13, but here we go!! (I will try to get better and more prompt about posting these, I swear!)

First, we had Anne working on a necklace and earring set for her mother:


Isn't it pretty?! 


Chessire spent some more time getting her scrapbooking done... I envy her, I have 2 drawers full of stuff I need to get in my scrapbook for HIGH SCHOOL that I STILL haven't gotten to!! One of these days.... Hopefully I can get that done before getting married and having kids to scrapbook for. 

Next up, Michelle was working a little on her silver polymer clay flowers for an upcoming wedding. These guys keep getting better and better!! 

Airon brought out the perler beads once again and had some fun... Guys, this is only 1 of the 2 boxes we've acquired of these things, and the 2nd box is more overflowing than this one! Also, we have about a dozen pegboards to use too!! They're still not enough! lol

Here she is working on some hearts...or is she?

Iron, iron, and iron some more!
Final design to be shown below...
Anne got in on some of the perler bead action and made these guys for her daughter!


This guy got ironed just enough to give him some pretty funk-a-licious hair, don'tcha think!?

After my first attempt of making a felted bunny here, I decided to make another one except I did it more like the original tutorial and did a more 3-D head. I left the ears for this craft day but after making 1, I decided to see what it would look like on my fella:

 You guys, I was *this* close to leaving him like this! But I was talking into making another ear....
As you can see, I was also talked into making a little cut-out in his new ear as if he's had some "special" times.

 My next project was to follow this tutorial and decided to try my hand at a felted rattle ball:
 This thing is actually pretty awesome... It's soft, it has a small rattle in there and is just pretty neat to begin with. We didn't have any bells or plastic eggs, but Anne was kind enough to supply me with a plastic ball from a toy she'd gotten her daughter and I put some beads in there. I then wrapped a ball around that with some yarn she also was kind enough to bum me (double-sided tape was the best we had or could find in getting the darn yarn to stick to the plastic ball but it worked fantastically!). Then I just used some yellow, blue and purple felt to make the outside! Took me about 10-15 minutes I believe to make this and so wasn't really that hard at all! I might just make some more!

 Then I decided to make a free-form piece that I could maybe turn into a wrist cuff or just an embellishment for a purse or something for later...
Final result at the bottom of this post...
 Anne saw this felting thing and decided to get in on the fun there too!! 

She made the CA-YOOTEST bunny!!!

Then Mr Bunny wanted to sit on Airon's heart-petal flower!!!

Here are all the final pieces (with the exception of my first 2-D bunny in there too) that got made this craft day!!

How's about that for a craft day spread!! We didn't get in progress pics but the butterflies were also made by Airon for her nieces and the felted ball bead (above the fish) was made by Michelle when she decided to test out the felting craft too! Bottom right is the final product of my possible future wrist cuff. I played around with using random pieces of felt as well as getting longer, bigger pieces and doing things like the twisted swirl on the left in blue, the folded over twist in purple at the middle top and the thinner loop of yellow on the far right.


I am sooo excited for where these craft days are going!! They have mostly been small, but hey, that means we can play around a little more with each others crafts and we still have lots of fun! I can't wait for next month!!

Craft ya laters!!


Thursday, December 13, 2012

Butterfly Paint Chip Art

I know there's dozens of versions of paint chip art out there, but it is pretty easy, cheap and can be made into so many different kinds of art! You can just cut random shapes out or you could use craft punches to make uniform shapes and arrange them into your art of choice. I decided to do a few pieces and have finished 2 so far that I will show you today.

**Disclaimer - My pictures are of poor quality, I know... I wasn't sure where my camera was so you'll have to suffer through my phone's camera pictures. Also, I've found it's pretty darn hard to get purples photographed either way and think this time it wasn't so bad!**

My boss loves purple. I'm not so sure about butterflies, that's probably more me than her, but I decided to give it a go to make a piece and see if she likes it. So I grabbed a bunch of different color purple paint chip samples:


 I went ahead and started cutting out the strips to use for my craft punches:

My awesome little tiny butterfly punch! It had a catch-all lid on the bottom, but I removed it as it was an easy hinge and would keep flopping down and couldn't hold more than 3 or 4 butterflies without them trying to get stuck in the punch's body itself!!

On the far right is my awesome 3-in-1 butterfly punch I got with a coupon. It can cut a basic butterfly, a butterfly with just the dots along the wings, and lastly, it can do butterflies with the dots and the inner wings cut-out. Love this punch!! It is pretty messy though, but very easy to switch between butterfly punch choices, to actually punch and of course, both punches are easy-lock shut.


I wasn't using regular canvases as I only have a few and just wanted to make a few smaller pieces that are easier to put up on our desk cube walls. I used a flat canvas that's about 8 1/2" x 11" that I had 2 3-packs of. So far, that means no cost as the paint chips were free, already had the canvases, the punches and the paint to paint the canvas silver:

Nothing too special...


The thing that I don't really see in many posts where other people are doing this paint chip art is how freaking hard it is to get the design you're wanting juuuuuust right! I had a heck of a time deciding exactly how to do this since I didn't want to cover the whole canvas!

Arrangement one...

Arrangement two....

Arrangement three....
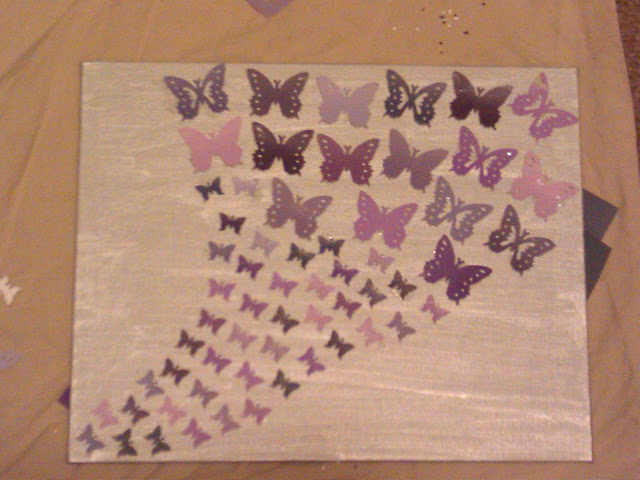
Needless to say, I tried a few different ways to put these things on here and was bothering my bff as she was hanging out with some schoolmates at a bar by texting her the various arrangements for her opinion. After sending her these 3 and maybe a couple more options, we settled on:


Her suggestion was to make them look more funneled from the bottom left corner to the top right. I was happy with this one and so I went ahead and glued them down. I used just a liquid glue stick thingie (my school glue sticks were apparently so old, they were dried out and looked like worms in their tubes... worms that didn't want to do anything but roll over and die :( I was sad...)

But there you have it!! What do you guys think?! I painted a second canvas with leftover silver paint since I realized I squeezed way too much on the first canvas, so there's a possibility of doing another one of these, especially since as soon as I was done and stood up, I spotted another butterfly punch I completely forgot I had (I've had it for about 10 years!) and it's a middle size between these two, just plain solid butterfly punch... I might try to do another version of this piece, maybe with the butterflies coming from middle bottom and splitting off to the sides? Lemme think on it and get back to ya'll.....

Also, wanted to share another piece I did as well in a similar fashion, only larger so that it's 16" x 24" or so:


I know, the other projects mostly cover a canvas as opposed to the whole thing, but I got a little cut-happy and made so many petals that I didn't want to NOT use them! And besides, I like it! :) That's all that matters, right? This one, I glued the pieces down, but then covered in a few layers of mod podge just to make sure none come up. I'm tempted to seal in resin later, and if I do, I will show you guys better pictures for one, and second, will show you guys the before and after!!

Til next time...........