I started this blog in late 2012, and a majority of the first 2 or 3 months' posts I put on here were in fact older ones from another blog, about other projects I'd done that I just wanted to put on here to consolidate.
I also started off 2013 with a "New Year" post, as well as tried to start what I called "Monthly Craft Challenge!" I don't want to say I didn't get a lot done in 2013, because I did get things done, I just didn't really keep up with my blog and projects as well as I would have liked. I also made goals in 2013 that I only somewhat kept up with, even after proclaiming them to the world, here on the interwebs.
The Monthly Craft Challenge lasted all of 1 month I believe, and I just barely completed that one. We did have craft days each month...up until October when people got too busy, myself included, to try and plan a craft day where we could all get together to work on anything. It probably doesn't help that my boyfriend and I hosted Halloween, Thanksgiving, Christmas Day, New Year's Eve and multiple other more casual get togethers throughout that time period at our house, so there's that cleaning and organizing of those events.
I was excited to get my real, first consignment deal at a local shop in town, and sold a few pieces of jewelry! But.... she decided to go full home decor in her lobby and asked me to take my items home since it was just jewelry and clutches. I was definitely saddened by this, but am glad none-the-less for the experience and at least the attempt to get my name out there in my town.
I've also had ups and downs at my day job, not sure which of more has happened, but either way it's been keeping me busy and not able to feel energized to do much in the ways of crafting.
Now, all this being said, I don't want to start off 2014 with a sort of resolutions list or anything, get myself too hyped up on goals that I'm not sure are really attainable for me, only to be disappointed later or feel bad about not doing those things. What I do want to say for myself, and for you dear readers if you've made it this far, is that I just want to hope for 2014 to be as full of new things as it can be, many new projects and creations, good times with friends and family and to make more time for just all around crafting and spending a little more time on the blog to share it all with you. I also want to practice taking better photographs so you can see my projects better, more clearly. I want to not go on hiatuses of weeks at a time. I want to find a way to keep better organized in my craft room; not completely organized as I know this is probably impossible, but at least organized enough in my room and thoughts and ideas that I'm actually excited to go home and get to working on something creative.
These are all simple ideas, but they are more difficult for me in practice. I just hope that I can try and if I do a little of what I'm hoping for, I know this new year will be happy and creative and I hope that you still stick around and share it with me!
Happy New Year!!
Craft ya laters!
Thursday, January 2, 2014

Monday, December 30, 2013
Loom Knitted Baby Blanket
All the loom knitting I've done so far has been using both sides of my long loom, back and forth, double-sided I guess? Like this one here. One of these days I'll learn the proper terms to better describe what I do for you guys.
Anywho, I have a friend who had a baby boy 2 months ago. I decided to make him a baby blanket, out of that really, really soft "Baby Blanket Yarn", using a new stitch technique. I used the video tutorial here from Loomahat.com to make the blanket, using a stitch that goes around the pegs on the loom, and I used my longest loom. My friend also chose a Monsters, Inc theme for the nursery so when I found this yarn that's mostly white with the soft blue and green bits in there, I couldn't resist!
The results:

I love it!! The pattern that switches back and forth between purling one row, e-stitching the next, is such a pretty pattern and so easy to do!!

Then there's the edges. The way you wrap the outer edge pegs, forms this awesome rope-like edge that just looks so finished. It looks good head-on...

...and from the front!


The only truly hard part I had was finishing the darn thing off. I will say, the YouTube video was pretty alright, except when she's showing you how to finish it. She accidentally goes off-camera with her hands and the part of the loom she's working on so it was a little difficult for me to understand (probably mostly with my limited knit and/or crochet skills) what she did if your row gets tight and you need to add an extra stitch here and there. I sort of figured it out towards the middle, but by then, it's really hard to recover and it got tight again, forming this little scallop part. Oh well, mostly it looks just as finished as the first row and the sides, and a friend I showed it to told me that babies like to nibble, so maybe that's what he'll do with the scallop point?

All in all, this blanket took me about 24 solid hours of work, and is 30" by about 38" or so long. I will be sending it out to my friend this week and can't wait to see what he and his fiance say about it! I really hope they like it!!
Now that I know the amount of time and effort that goes into this type of project, I want to start thinking about doing smaller squares and make an afghan for myself to use in the living room when I get cold. That means I'd have to learn the whole stitching-pieces-together thing, but hey, challenges are fun! Right? Right!!
Craft ya laters!!
Anywho, I have a friend who had a baby boy 2 months ago. I decided to make him a baby blanket, out of that really, really soft "Baby Blanket Yarn", using a new stitch technique. I used the video tutorial here from Loomahat.com to make the blanket, using a stitch that goes around the pegs on the loom, and I used my longest loom. My friend also chose a Monsters, Inc theme for the nursery so when I found this yarn that's mostly white with the soft blue and green bits in there, I couldn't resist!
The results:

I love it!! The pattern that switches back and forth between purling one row, e-stitching the next, is such a pretty pattern and so easy to do!!

Then there's the edges. The way you wrap the outer edge pegs, forms this awesome rope-like edge that just looks so finished. It looks good head-on...

...and from the front!

I had to use 2 skeins of yarn, so there is the inevitable tie-off knot in there, and this is what it looks like up close, but you'd be hard pressed to just see it when you look at the blanket as a whole.

The only truly hard part I had was finishing the darn thing off. I will say, the YouTube video was pretty alright, except when she's showing you how to finish it. She accidentally goes off-camera with her hands and the part of the loom she's working on so it was a little difficult for me to understand (probably mostly with my limited knit and/or crochet skills) what she did if your row gets tight and you need to add an extra stitch here and there. I sort of figured it out towards the middle, but by then, it's really hard to recover and it got tight again, forming this little scallop part. Oh well, mostly it looks just as finished as the first row and the sides, and a friend I showed it to told me that babies like to nibble, so maybe that's what he'll do with the scallop point?
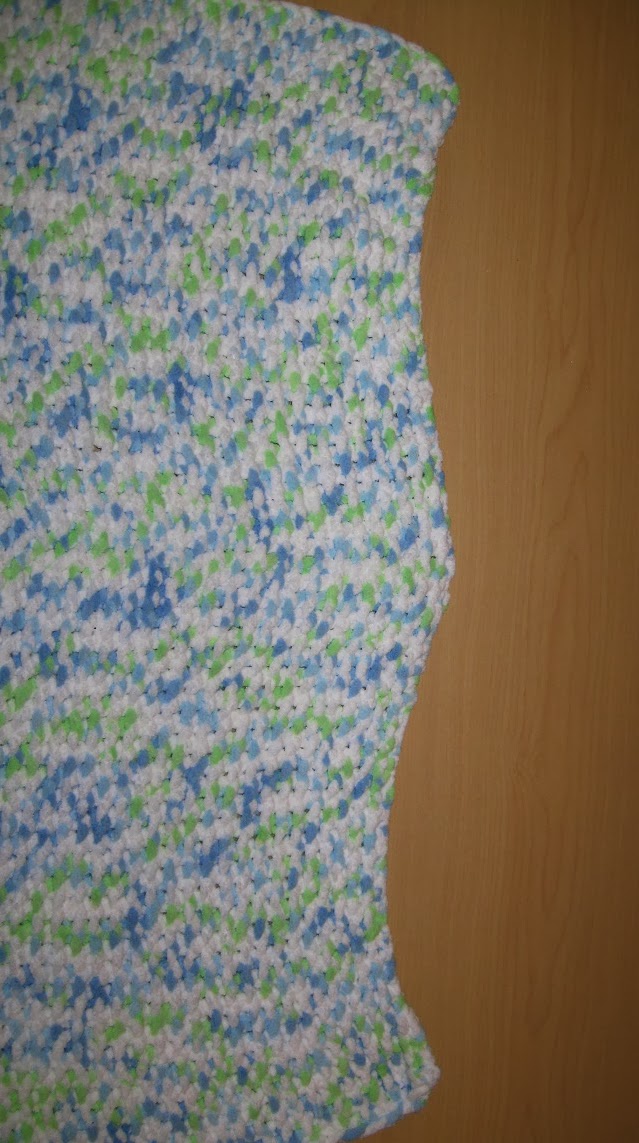
All in all, this blanket took me about 24 solid hours of work, and is 30" by about 38" or so long. I will be sending it out to my friend this week and can't wait to see what he and his fiance say about it! I really hope they like it!!
Now that I know the amount of time and effort that goes into this type of project, I want to start thinking about doing smaller squares and make an afghan for myself to use in the living room when I get cold. That means I'd have to learn the whole stitching-pieces-together thing, but hey, challenges are fun! Right? Right!!
Craft ya laters!!
Monday, November 11, 2013
Why is staying organized so gosh darned hard?!
I always let my craft room get so messy I can hardly walk around in there. Then I spend hours cleaning it up, only to let it get messy all over again within a matter of weeks, sometimes days! I have the understanding that being crafty and having as many crafts and hobbies as I do, my room is bound to get messy once in a while, but I just can't seem to really understand why and how my room gets as bad as it does, as frequently as it does!
I spent 3 hours in my room one night some weeks ago and another 3 hours the next night for example, and still did not quite done. I felt closer to getting fully organized than I have ever before. I even went and bought yet another plastic sterilite drawer organizer to put in there so that I can reduce the number of shoe boxes I use for things. In particular, my perler beads. Would you believe I have enough perler beads to fill 2 shoe boxes and they're overflowing AND there's more that were ordered and I'm just waiting on them to get delivered!! It gets a little old trying to carry around 2 shoe boxes whenever I want to work on anything perler related, especially since one of them is starting to fall apart it's been so full for so long.
I got to a point in my room where it was clean again, and was looking good...


Yet another with great organization but with half everything behind closed doors, the rest in easy to see/find containers..
I spent 3 hours in my room one night some weeks ago and another 3 hours the next night for example, and still did not quite done. I felt closer to getting fully organized than I have ever before. I even went and bought yet another plastic sterilite drawer organizer to put in there so that I can reduce the number of shoe boxes I use for things. In particular, my perler beads. Would you believe I have enough perler beads to fill 2 shoe boxes and they're overflowing AND there's more that were ordered and I'm just waiting on them to get delivered!! It gets a little old trying to carry around 2 shoe boxes whenever I want to work on anything perler related, especially since one of them is starting to fall apart it's been so full for so long.
I got to a point in my room where it was clean again, and was looking good...

See, doesn't that just look nice and neat!? That bottom right drawer btw? Yeah, that's the perler bead drawer, STUFFED full!
Only problem is, fast-forward to Halloween prep and party.. cleaning the living room up of all the boxes and things I ended up not using to decorate and you get this:
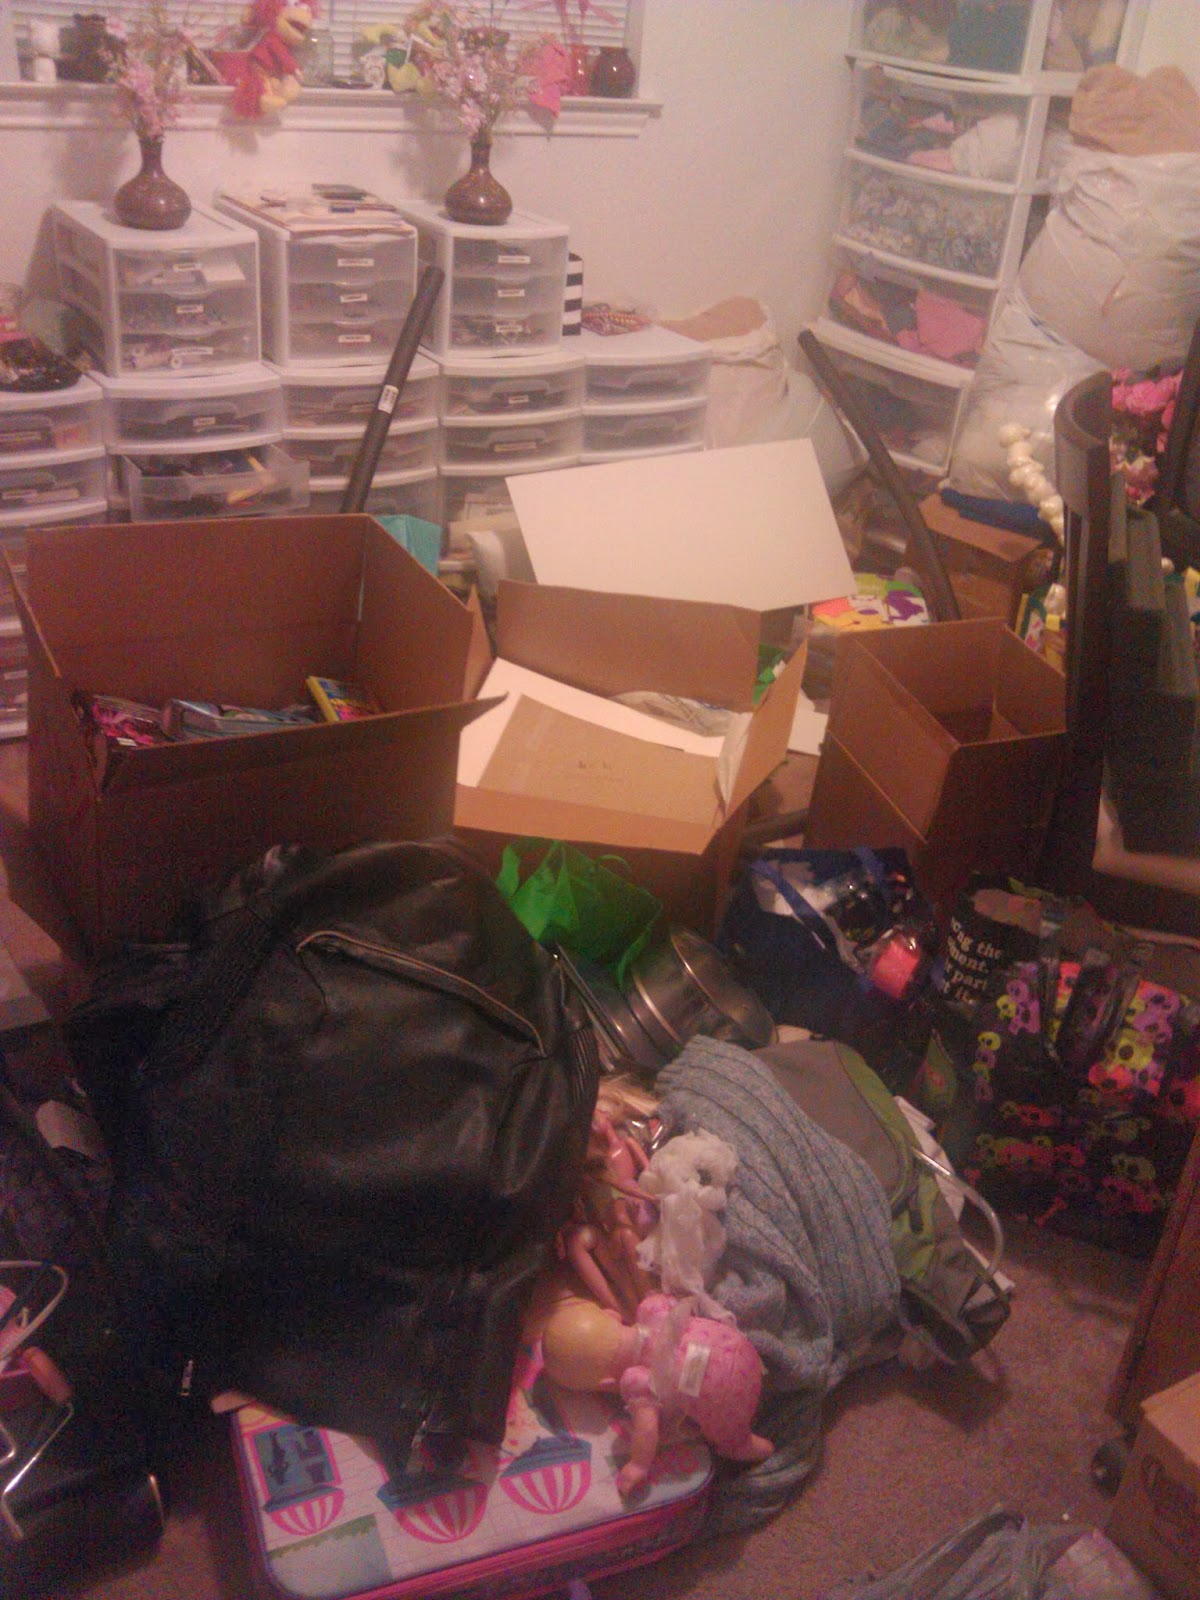
Yeahhhhh...... my room seems to end up the end-all, be-all place where things get dropped if I'm not sure where to put them for now and/or don't have the time to really be careful about setting things aside in its proper place or put back together properly. I feel like most everything has a place and I try to keep it all in its place, but it just keeps getting to the point where I can't get in there and either decide to be lazy and don't do anything, or I get the supplies out and go to another room like the living room so I can sit with BF and watch tv while crafting.
Like the other night. I had to work on a clutch for a friend but didn't have the time or patience to clean my room to get to my sewing table so I just grabbed my machine, pedal/plug, ironing board and iron and used the kitchen table. Not quite the best solution but I did have plenty of space, got to watch the big tv in the living room while working (BF was out with his brothers and I fell to a guilty pleasure of a horribly silly reality show... "Say Yes To The Dress!"). Somehow though right when I was on the 2nd to last step, sewing around the whole outside of the lining and outside pieces and over the zipper before the flippity-flop to put it all right side out, my needle got to a point where it kept hitting.... something....and I broke 3 needles!!! THREE!! The first two were while I was going over the zipper, but when the 3rd broke over just the few pieces of fabric, I got so frustrated I turned the machine off, picked up my beer and just resigned to the sofa.
It definitely helped being in a common area when BF decided to take a look and helped me fix my machine. He took a look at my machine and found that for some reason, the needle was getting dragged back a little from the vertical drop it's supposed to do and was stabbing the metal plate below it! There was a visible hole from one of the hits too!! He took the plate off and took it to the garage where he quickly drilled at the side of the hole to widen it. Once he put it back on, I was able to finish the clutch! YAY!! He totally saved the day and my sanity!! Thank you, BF!!
While this was awesome that he could help me so easily, there's still the actual matter that I shouldn't have been in the kitchen to begin with; I should be able to work in my room at any time on any project and not have to spend hours cleaning first, or worse, move to another room altogether!
Like always, this type of situation gets me to dreaming... I dream of our future home where I can put holes in the walls (more than my current pegboard which is all I'm allowed currently to lessen the fixing when we move out) and have more permanent fixtures up so I don't have to use all the sterilite containers I use now. Of being able to paint the walls and not struggle to try and find creativity in a white box. Most of all, I dream of having a space that I feel proud of and comfortable enough in that I WANT to keep it cleaned and organized and I have no problem being able to keep it that way and that just breeds creativity and action!
Here are some ideas of rooms I love elements from and want to use for inspiration:
I love the idea of the big central working space with little shelves in it for frequently used items, but ease of getting to the rest of the room...
 |
| Artful Leigh Craft Room |
I love that everything has a place, and everything is in its place...
And I especially love the corner/wrap-around desk and she has her sewing machine in the corner where there's the most room...
This room I like bc it's got all different kinds of containers that are all organized as well as coordinated with the same kind of label. That and like the one before, everything has a place and it's all in there!!
 |
| Unfortunately, there's no source on this one that I can find. |

I am just soooo envious of these gals getting their spaces organized and looking so good and I look at my room and just wonder how or IF I can ever hope to be that organized. I keep trying and trying, I'll spend hours cleaning up, organizing, trying to go through old items and clearing out things I don't think I'll ever use, but it's just never quite enough.
Do any of you have this same problem? How do you try to keep your space clean? What kind of steps do you take? Is it easier to clean up after every project or dedicate a day of the week to clean up after the whole week? Let me know in the comments!
Craft ya laters!!
Friday, November 8, 2013
Holiday Plans
While I am waiting to get ahold of pictures taken of the Halloween party I had this last weekend to show you guys, I have started looking ahead at the holidays and making plans for what I want and need to get done.
We have decided as a family/group that BF and I are hosting Thanksgiving, Christmas Day and New Year's Eve at our house. We have also thrown around the idea of an ugly/tacky Xmas Sweater Party! Since we're doing so much entertaining already, and we don't want to overfill our weekends for the last 6 weeks of the year, I'm not sure if that last one will be a Xmas sweater party, or just tacky sweater party maybe in January? But there is also the matter of us wanting to take the weekend of December 6-8 for ourselves as our 6-year anniversary is on the 7th!
But what holidays mean is that I get to try and come up with some decorations perhaps to put up for Thanksgiving and Christmas. I borrowed Christmas decorations from my parents last year as well as BF's brother's tree (he and his wife weren't able to get it up and since they weren't hosting any family event...) so I had that covered, but what about Thanksgiving?! I'm thinking at the very least I can make more yarn chain/garland to put under the kitchen bar and over the fireplace like I did for Christmas last year, with orange and brown perhaps? But what else?!
Most of the pictures you see online are of table centerpieces or fireplace decorations... on a ledge or shelf. We do not really sit at a big table (numbers are way too many for that) and we don't have a ledge or shelf over our fireplace, nor do we plan on installing one as we are only currently renting. This is something I will definitely have in the house we plan to purchase, but for now, no ledge. We do have the bar countertop from the kitchen to the living room, but what can I put on there that will look nice and not cluttered. What can I put in the dining room area where the food will be set out for people?
As for regular decorations to place around the living room and dining area, there are some that are a little too simple and would be better suited if we had kids...
 |
| Leslie's Latest Creations |
Some decorations, although cute and/or funny, are a little outdated...
 |
| Vintage Thanksgiving Decorations |
 |
| A Cultivated Nest Thanksgiving |
Although, looking through Pinterest at Thanksgiving decoration ideas, it makes me realize that when we do get our house one day, I kinda hope to be able to have a little more formal a setup and house layout so that we can have some of the nicer decorations make sense. Currently, we have only a little square table in our dining area as a full 6-seater table would not fit, with chairs, to eat at. Forget about the idea of eating in there at all when it's a family holiday anyways since his side has 6-8 direct family members, I have 3, but we also invite friends of the family and friends from work and it gets up to about 30-40 people for the holidays!!
We will just do what we always do, setup the 4-seater and an additional folding long table (like Halloween in a T backing to the window between the shelves) to layout the food on and people will either stand in the kitchen eating while talking, find a seat in the living room or just go to the backyard and eat over their laps as we only have 1 table out back. **siigh** It's fun times, I just sometimes dream of having a little more formal, closer to family oriented holiday so it doesn't get quite so crazy, but then that's probably because before meeting BF, I never EVER had a family/friend base like we have now. Holidays used to be just my mom, dad, brother, me and my grandma. So you can just imagine the culture shock I had the first few holidays we had when I realized the first one wasn't a fluke, nor was the second, and wow, it's ALWAYS like this?!
Anywho, enough of the rambling. I'll come up with something and show you guys what I do come up with.
In the meantime, this month will (hopefully) be reserved for things like working on scarves with all the yarn I got last month (yay sales!), finishing the baby blanket I started for a friend (that's a post all its own!) as well as trying to get the jewelry and clutches posted on my website that I got back from Easely Amused to see if any of those might possibly sell, maybe work on some new ones for Xmas times as well as finish the 3 I owe my boss and friend plus many other things on my plate!
There's always things to do when you're a crafter!!
Craft ya laters!!
Thursday, November 7, 2013
Resin Time!!
I am really really excited you guys!! I follow Carmi Cimicata on her Resin Crafts blog and on 10/1/13, she posted about a project she wanted her readers to participate in: Resin Time! I sent an email to her with my address and sat back to wait for an email to let me know I'd been chosen to participate.. and waited...and waited. Hmm... I guess she had enough people respond before me, and I couldn't participate. Maybe next time!
But then... late last week I got a package in the mail. I opened it and there it was! My very own time piece bezel!!

But then... late last week I got a package in the mail. I opened it and there it was! My very own time piece bezel!!
From her blog:
"Your watch face will be photographed and then I will be displaying them all in our huge booth at CHA in California in January. That is the biggest crafting event in the world and I want your resin timepiece to be with me!
I plan to have a judging committee to select the top 10 favorites, which will be further featured on Resin Crafts Blog!"
The only requirements are to use either the ETI Resin and/or the Resin Clay. That doesn't seem too difficult but the question is, what the heck will I put in the thing?! I don't know, but I'm excited to be a part of this and can't wait to see what all the finished pieces look like from all the other participants!
Tuesday, October 22, 2013
How-to: Making a Spider Egg Sack Halloween Prop
Hey guys!! I've been working here and there on some of my Halloween props and getting small stuff back up that I had last year (garland under the bar counter, 'flight of the bats' from the ceiling, webbing on the pictures in the living room, etc) but I went ahead and got more of my spider Egg Sacks made last night that I originally made 2 of about 3 years ago and wanted to make a tutorial for you so you can have some of your very own too!!
Doesn't this look just the creepiest!?

First, you'll need to get your supplies:
- Spray Adhesive
- Balloons (I use black, but you just want to use something that won't be noticeable, so white, black maybe green or gray...)
- Plastic spiders
- Plastic/paper plate or painter's tray for paint
- Sponge
- White fabric (I used a $3 twin sheet from Wal-Mart)
- Acrylic paint in gray, green and brown
- Webbing
- Surface you don't mind getting adhesive and paint on (I use a piece of another sheet I used for other props before; as you can tell, it's used a lot!)

For my egg sacks, I mixed gray, green and brown paint together in about equal portions to get this olivey, sickly type of green:

I blew up about 6 balloons and tied them off. The fabric I cut in varying sizes of thick/thin square-like and longer rectangles. Think of these like papier mache strips. Once you've got your fabric pieces cut, grab a balloon and your spray adhesive. Now, I actually popped a balloon spraying too much and/or that particular balloon was a little weak. I'm not sure which, so just be careful in spraying too much.
Spray adhesive, if you've never worked with it, is very very sticky. It also works better when you spray less than if you spray more. You can either spray the pieces of fabric or the balloon directly and then apply the fabric strip to the sticky spots on the balloons. This is the easy part as you don't have to be clean or organized at all!! In fact, you WANT to put the pieces as disorganized and wrinkly as possible!

The more wrinkles you can get on these pieces once they're laid down, the better. You also want to get about full coverage, but it's ok if little spots show through:

Don't worry about covering where the knot of the balloon is, you'll usually not see this part as you'd use the knot to tie string on and tie this guy up to hang somewhere in the corner.

Once you've got all the fabric stuck on the balloon and the adhesive has been able to dry for a bit, go ahead and grab your sponge. Here's where you get to see where having all those wrinkles come into play!! When you sponge on the paint, you don't want to have full coverage, you want to be able to see some white showing through, but it's up to you on how much white vs green you have. Notice when you sponge on the folds and wrinkles of the fabric, you get the appearance of veins!

This is about what you should see once you've got the whole thing painted. See those awesome creepy veins?!

Next, grab some webbing, but only a little piece. Webbing most of the time comes in these big, fat, yarn-like strands. I cut off about a 4"-6" piece for these balloons. Stretch it out a little beforehand so it's a little easier to spread. Grab your adhesive spray and lightly coat a good size portion of the visible balloon surface you can see. Spraying this much makes it faster on sticking down the webbing so you're not re-spraying in between each little area where you're laying it down.

When you're done with the webbing, just go ahead and stick a few plastic spiders in among the webbing and you're done!

Here's one I made last time, 3 years ago.

You might be thinking to yourself, "Self, how on Earth did she keep these old egg sacks inflated for 3 years?! Balloons don't last that long!! What the heck?!"
Well Self, I'll tell you! The other awesome thing about these besides being easy and cheap to make and giving you an easy, creepy prop, is that once you're done with them for the year, all you need do is take out the balloon (pop it) and flatten out the fabric!
 |
| Flattened Egg Sacks |
When next year comes around, the fabric will have stayed together well enough that all you need to do is stick a new balloon in there...


Inflate and voila! All you need do is maybe spot-check a few places where the corners of the fabric may have come up over time, but you can totally re-use these!! The only thing to watch out for is over inflating the balloon to bigger than it was the previous year as if you do, you will make all the fabric pieces come apart!
With my two from before, and one of my new ones, I just tied fishing line around the knots of the balloons and put them in the ceiling with a push pin!

What do you guys think?? Is this something you will be adding to your list for this Halloween or maybe next? Let me know how this method worked out for you and what your egg sacks look like!! I'd love to see them!!
Craft ya laters!!
Friday, October 18, 2013
Sad News About the Consignment
I know I've been pretty MIA lately guys, I apologize. Work yet again continues to get in the way. I hope to really get my butt in gear this weekend to finish the Halloween prop I teased you with before, but also to work on a bit of the other things I have planned.
I wanted to put up a quick post however to let you know that Tuesday was a sad day for me....
I emailed the woman in charge of the shop I was on consignment with, Easely Amused, and she let me know that they've decided to go full on with home decor items in her lobby only going forward. This means I had to go ahead and pick up my stuff to bring it home as they're accessories.
I dreaded actually going so I did wait until the last day she'd asked me to have it out by, but at least once I got there, it wasn't nearly as awkward as I worried it might be (she's a really really nice gal). We chit chatted about how things are going, and when she asked me about plans for Halloween, I got to brag a little on what I've worked on so far and what my plans will be.
I am sad that it didn't last too long, but I am glad I at least made a few sales and I appreciate her allowing me to use space in her lobby to display my items.
I'm not sure if I'll try to look for another place to display my items just yet however as this time of year starts to get pretty hectic with family plans and work trying to get what it can before people are gone for the holidays. On top of that, I applied for a manager position here and am waiting to hear back about an interview and then we'll have to see what happens from there! If I get it, I'm not entirely sure what that'll mean for my free time or sanity, but I am thinking maybe it'll mean I'll HAVE to do some crafting here and there to keep my sanity or to relax on weeknights or weekends.
Hint: I'm kiiiiinda into making knitted scarves again and have already made my new one for the season!! That post to follow.... ;)
Anywho, thanks for sticking around and bearing with me and as always,...
Craft ya laters!
I wanted to put up a quick post however to let you know that Tuesday was a sad day for me....
I emailed the woman in charge of the shop I was on consignment with, Easely Amused, and she let me know that they've decided to go full on with home decor items in her lobby only going forward. This means I had to go ahead and pick up my stuff to bring it home as they're accessories.
I dreaded actually going so I did wait until the last day she'd asked me to have it out by, but at least once I got there, it wasn't nearly as awkward as I worried it might be (she's a really really nice gal). We chit chatted about how things are going, and when she asked me about plans for Halloween, I got to brag a little on what I've worked on so far and what my plans will be.
I am sad that it didn't last too long, but I am glad I at least made a few sales and I appreciate her allowing me to use space in her lobby to display my items.
I'm not sure if I'll try to look for another place to display my items just yet however as this time of year starts to get pretty hectic with family plans and work trying to get what it can before people are gone for the holidays. On top of that, I applied for a manager position here and am waiting to hear back about an interview and then we'll have to see what happens from there! If I get it, I'm not entirely sure what that'll mean for my free time or sanity, but I am thinking maybe it'll mean I'll HAVE to do some crafting here and there to keep my sanity or to relax on weeknights or weekends.
Hint: I'm kiiiiinda into making knitted scarves again and have already made my new one for the season!! That post to follow.... ;)
Anywho, thanks for sticking around and bearing with me and as always,...
Craft ya laters!
Subscribe to:
Posts (Atom)