Sections

Tuesday, October 22, 2013

How-to: Making a Spider Egg Sack Halloween Prop

Hey guys!! I've been working here and there on some of my Halloween props and getting small stuff back up that I had last year (garland under the bar counter, 'flight of the bats' from the ceiling, webbing on the pictures in the living room, etc) but I went ahead and got more of my spider Egg Sacks made last night that I originally made 2 of about 3 years ago and wanted to make a tutorial for you so you can have some of your very own too!!

Doesn't this look just the creepiest!?


First, you'll need to get your supplies:

  • Spray Adhesive
  • Balloons (I use black, but you just want to use something that won't be noticeable, so white, black maybe green or gray...)
  • Plastic spiders
  • Plastic/paper plate or painter's tray for paint
  • Sponge
  • White fabric (I used a $3 twin sheet from Wal-Mart)
  • Acrylic paint in gray, green and brown
  • Webbing
  • Surface you don't mind getting adhesive and paint on (I use a piece of another sheet I used for other props before; as you can tell, it's used a lot!)


For my egg sacks, I mixed gray, green and brown paint together in about equal portions to get this olivey, sickly type of green:


I blew up about 6 balloons and tied them off. The fabric I cut in varying sizes of thick/thin square-like and longer rectangles. Think of these like papier mache strips. Once you've got your fabric pieces cut, grab a balloon and your spray adhesive. Now, I actually popped a balloon spraying too much and/or that particular balloon was a little weak. I'm not sure which, so just be careful in spraying too much.

Spray adhesive, if you've never worked with it, is very very sticky. It also works better when you spray less than if you spray more. You can either spray the pieces of fabric or the balloon directly and then apply the fabric strip to the sticky spots on the balloons. This is the easy part as you don't have to be clean or organized at all!! In fact, you WANT to put the pieces as disorganized and wrinkly as possible!


The more wrinkles you can get on these pieces once they're laid down, the better. You also want to get about full coverage, but it's ok if little spots show through:


Don't worry about covering where the knot of the balloon is, you'll usually not see this part as you'd use the knot to tie string on and tie this guy up to hang somewhere in the corner.


Once you've got all the fabric stuck on the balloon and the adhesive has been able to dry for a bit, go ahead and grab your sponge. Here's where you get to see where having all those wrinkles come into play!! When you sponge on the paint, you don't want to have full coverage, you want to be able to see some white showing through, but it's up to you on how much white vs green you have. Notice when you sponge on the folds and wrinkles of the fabric, you get the appearance of veins!


This is about what you should see once you've got the whole thing painted. See those awesome creepy veins?!


Next, grab some webbing, but only a little piece. Webbing most of the time comes in these big, fat, yarn-like strands. I cut off about a 4"-6" piece for these balloons. Stretch it out a little beforehand so it's a little easier to spread. Grab your adhesive spray and lightly coat a good size portion of the visible balloon surface you can see. Spraying this much makes it faster on sticking down the webbing so you're not re-spraying in between each little area where you're laying it down. 


When you're done with the webbing, just go ahead and stick a few plastic spiders in among the webbing and you're done!


Here's one I made last time, 3 years ago.


You might be thinking to yourself, "Self, how on Earth did she keep these old egg sacks inflated for 3 years?! Balloons don't last that long!! What the heck?!"

Well Self, I'll tell you! The other awesome thing about these besides being easy and cheap to make and giving you an easy, creepy prop, is that once you're done with them for the year, all you need do is take out the balloon (pop it) and flatten out the fabric! 

Flattened Egg Sacks
When next year comes around, the fabric will have stayed together well enough that all you need to do is stick a new balloon in there...


Inflate and voila! All you need do is maybe spot-check a few places where the corners of the fabric may have come up over time, but you can totally re-use these!! The only thing to watch out for is over inflating the balloon to bigger than it was the previous year as if you do, you will make all the fabric pieces come apart!

With my two from before, and one of my new ones, I just tied fishing line around the knots of the balloons and put them in the ceiling with a push pin!


What do you guys think?? Is this something you will be adding to your list for this Halloween or maybe next? Let me know how this method worked out for you and what your egg sacks look like!! I'd love to see them!!

Craft ya laters!!

Friday, October 18, 2013

Sad News About the Consignment

I know I've been pretty MIA lately guys, I apologize.  Work yet again continues to get in the way. I hope to really get my butt in gear this weekend to finish the Halloween prop I teased you with before, but also to work on a bit of the other things I have planned.

I wanted to put up a quick post however to let you know that Tuesday was a sad day for me....

I emailed the woman in charge of the shop I was on consignment with, Easely Amused, and she let me know that they've decided to go full on with home decor items in her lobby only going forward. This means I had to go ahead and pick up my stuff to bring it home as they're accessories.

I dreaded actually going so I did wait until the last day she'd asked me to have it out by, but at least once I got there, it wasn't nearly as awkward as I worried it might be (she's a really really nice gal). We chit chatted about how things are going, and when she asked me about plans for Halloween, I got to brag a little on what I've worked on so far and what my plans will be.

I am sad that it didn't last too long, but I am glad I at least made a few sales and I appreciate her allowing me to use space in her lobby to display my items.

I'm not sure if I'll try to look for another place to display my items just yet however as this time of year starts to get pretty hectic with family plans and work trying to get what it can before people are gone for the holidays. On top of that, I applied for a manager position here and am waiting to hear back about an interview and then we'll have to see what happens from there! If I get it, I'm not entirely sure what that'll mean for my free time or sanity, but I am thinking maybe it'll mean I'll HAVE to do some crafting here and there to keep my sanity or to relax on weeknights or weekends.

Hint: I'm kiiiiinda into making knitted scarves again and have already made my new one for the season!! That post to follow.... ;)

Anywho, thanks for sticking around and bearing with me and as always,...

Craft ya laters!

Friday, September 13, 2013

2013 Halloween Prop #1 - WIP Pics with Full Reveal Later!!

Hey guys!! I know I've been a little sparse of late, but day job has been kicking my butt lately!! It's busy while I'm at work, and then by the time I get home, I'm just pooped!!

I did start on a Halloween prop for this year however this last weekend that I can maybe tease you with for a little bit.... ;)

Testing for doll size/fit.....


Boyfriend suggested I use a bigger baby so it'd look like it was jammed in there as opposed to me wanting to have enough room for it.... don't want the baby to be able to get up after all, do we?!?!! Mwahahhaa....

Starting to work on ghouling up the baby doll.... don't mind the pipe insulation pieces, that's for another prop I will be working on soon....


A little close-up of the baby in the painting process...


I know, it's not much and my pictures are le suck, but this is about all I've really had time or energy to do!! This weekend I hope to get this as well as a few more things done as I'm focusing tomorrow at least on this month's Craft Day - Halloween Themed!!

I'll post all the pictures (including these again) once the whole thing is complete and show you guys later what else I'm working on/have gotten done for my other props!!

Craft ya laters!!

Friday, August 23, 2013

The 30 Minute Challenge

The other night, my boyfriend and I were watching tv together for a few hours. I realized it was about 8 o'clock however, and needed to work a little and make at least one of the things I have people wanting to pay me for. I told him I needed to work for a bit and his response of course was, "Ok, see you in an hour, if even." I simply stated, "I don't need an hour, I can work for only half an hour and be back in here!"

Needless to say, he didn't believe me so I made sure when I went to my craft room, to take special note of the time. I didn't do a clutch as I know for a fact these take about an hour, maybe an hour and 15 minutes for me to make, so I tested myself on making a simple tablet case with no frills or bows or anything.


Wouldn'tcha know, I totally won the challenge and was back in 30 minutes to watch some more tv with him!!

He did ask me when I got back however if it would even fit her tablet, and did I check to make sure? So he made me sufficiently paranoid enough to ask her exactly what tablet she has (Kindle Fire) so that I could look up the exact dimensions to my Nexus 7" tablet and there was only a 10mm difference on top to bottom measurement! Yay!! AND she likes how it looks! 


Now I only need to finish her clutch and I'm golden!!

Craft ya laters!

Wednesday, August 21, 2013

First attempt at inchies

I've recently become aware of these things called "inchies" thanks to the craftster.org forums. An insightful post about what they are, as well as what "rinchies", "twinchies", "moos" and "rolos" are is here.

I am still trying to figure out the appeal, but in the process, I decided to make a few for myself:


A close-up for a little more detail:


I made these by cutting up an ATC card for watercoloring on into the 1"x1" pieces and once they were all created, I glued them to a piece of cardstock for scrapbooking to use as a display. I did trim it down a little so the inchies could be closer to each other instead of spread out on the whole piece of cardstock.

For something like this, I can see the appeal I suppose... it just depends on what you actually put on them or how you decorate them. These I feel were a little empty, until I put them together on the background and then they didn't look quite so 'meh'. I'm not sure about doing ones that aren't part of a collage or set such as these, but I may try a few more at some point and see what I can come up with. I especially want to try to do a themed set for my bff who loves the Firefly series/movie and the quote "I am a leaf on the wind, watch how I soar." in particular.

Even when I tried explaining to my boyfriend and the friends we had over the other night what I was doing and though why, "They're art... ya know,.. used for jewelry, to display, magnets.... things like that?" I was still a little unsure myself of why I was making them. 

I have been searching for ideas and different ways to make them, decorate them and display them and so far, I will say that Kira's blog "Oops, I craft my pants" has given me a TON of inspiration and I might try to do some of the things she's done such as:


Tiny scraps into colorful collage
Another teeny inchies book
Three bird inchies made from scraps

I really want to try something like these as some of the other ones I've seen (not going to show as I don't want to appear to be badmouthing any other artist, each person's opinion is their own and I don't want to hurt anyone's feelings from my personal feelings or opinions) are a little too cluttered for my personal tastes or I can't quite understand why they put as much clutter on the pieces as they did, etc. The ones Kira does are minimal, but colorful and cute as all get out, much more my style and taste!

I love having small-scale art and things to put up on my wall at work so that's maybe the biggest appeal for me on these guys. I do particularly love the idea of a little inchies book though, something maybe I can adapt for the months or maybe the days with no month specified type of thing...

The other thing though is that it doesn't just have to be inchies! I have done a couple of ATC cards here but only did the 2 as I wasn't sure what else to put on them at the time, but there's the whole genre of these guys with the rinchies and twinchies too:

Inchies, rinchies and twinchies!
Rinchies are round inchies and twinchies are 2" square pieces, you have a little more room on those to work on a design. But there are also trinchies (3" square pieces) and moos (basically artist trading cards, ATCs) and rolos (altered rolodex cards).

Yeah, she has some pretty awesome stuff that she's made and is sooo inspiring to me!!

Craft ya laters!!

Monday, August 19, 2013

Origami flower bunch in purple and black

My friend asked me to help her make some origami flowers for her wedding reception decorations. The style was this, called kusudama:


Simple enough, yeah?

Well, I got so intrigued with trying different colors and patterns, I went and got an old used copy of Jane Eyre to use those pages. It was pretty funny as I was doing this in the living room while watching a movie with my boyfriend and he looks at me funny and this is the conversation we had:

Him: Are you cutting up a book?!?
Me: Yes, yes I am.
Him: Why would you do that?!
Me: I'm crafting, duh?
Him: Well, is it a good book?
Me: *shows him the book title* Have you heard of it or read it?
Him: Oh. No. Carry on.

Now granted, I haven't read the book yet and I plan on one day reading it, but it wasn't that great a copy and I was making a flower primarily for personal practice and to recall how to make them, then the 2nd was going to be for my bff, Airon.


I used regular Elmer's glue for the pieces to be closed on themselves and to each other in the pairs, but then used hot glue to attach to these silver foil-like pipe cleaners I had in my stash, folded in half to be sturdier.


Then this last weekend I decided to make a whole bunch of flowers to give my boss cuz she's awesome!! Her favorite colors are purple, black and silver so I went to Hobby Lobby and got some 12"x12" sheets of scrapbooking paper, cut out 4" squares, painted some 1/8" (I think) dowel rods silver with acrylic paint, 2 layers and...


There are 8 total flowers in this bouquet and my hands didn't really start hurting/cramping until flower 8, so I call that a total win! I think it also helps when you assembly line the flower parts and then space it out with gluing together. Fold petals for 2-3 flowers...glue...fold 2-3 more...etc.


I tried to get a picture of the full bunch at a distance in front of one of the windows at work... didn't realize the colors were so bad, but you get the idea of how they look, right? I used some simple white/clear/AB glass marbles in the vase to give it a little more color.


Needless to say, my boss LOVES them!! ^_^ I'm thinking I might have to try making myself a bunch or two or ten! I do however want to try making them smaller, maybe see how small they would be with 3" square pieces of paper, but I also saw this and want to try it as I had the idea in my head and seeing it really does encourage me to have some to display cuz they look awesome!!


I just LOVE how that looks!!! I like the idea of using the alternate color as the leaves, but I'm also wondering how it'll look to have the 6 petal flowers (like what I did) and use an alternate color that's a little darker or lighter and try to mimic a real flower with layers of petals....

Don't worry, I'll definitely show you guys what I try and how they look!!

Anyone that hasn't heard of these and/or wants to try making some, this tutorial is fantastic and the site also has a bunch more tutorials for making all kinds of other origami things!!


Craft ya laters!

Saturday, August 10, 2013

Halloween 2013 prep has begun!!

Yes! I have begun preparations for Halloween 2013 decorations! Yay!!!

In Austin, there is a Goodwill outlet type place you can go to and get anything that would normally be at a Goodwill, only even cheaper! They have clothes, housewares, luggage, shoes, toys, books, furniture... the only catch is that it's not hung up or on shelves or neatly laid out, not really:


Yup! You are indeed seeing that right! Everything is just in big blue bins! They dump out the items in these bins and wheel them out to the floor in rows. It's a little interesting because they guard a new row of bins and don't let anyone near them until the whole row has been wheeled out and the employees I think have been able to get out of the way.

I'd heard and seen reviews of other people going and freaking out at the people that practically swarm on the bins once you're allowed and how crazy and scary it is.... I didn't think it was too bad. I wasn't too interested in getting first pick on what was being put out and so I kept my distance, going through the housewares and toy bins mostly, so it didn't bother me how other people were behaving. In fact, all in all, I had a pretty fantastic time. So much so in fact, and this is mostly due to being with my friend Adeana (the one who told me about this place and got me excited to go in the first place), we were there for almost 3 hours by the time we checked out and decided to head out of there!!

Now, you're wondering what I went for, right? Well, like I've shown in my "looking forward to Halloween post", I went mainly looking for cheap, ratty dolls I wouldn't feel bad about defiling and painting to look gross, gory, dead, etc! And boy howdy, I  made out like a freaking PACK RAT!!!

Full doll haul

In the above picture, I had piled most of the Barbie-type dolls in a case. Below, they're all laid out nice and neat (ish) to give you a better idea of exactly how many there are. I believe when I counted, there's about 35 full and partial dolls?

I love the fact I found just a head, and its hair was nearly entirely chopped off! I had to have this shot with one bigger baby holding it like "it's ok... shhh...." and the one next to him going "holy crap!!"


Anyone else recognize this case?? I may still have mine in a box or closet somewhere, but I definitely had one of these growing up to keep my Barbies in!! Adeana suggested I dirty it up, tear it a little and make some sort of zombie doll case somehow.... we'll see how I manage that one lol.


Here we have my big baby dolls!! I believe about 20 total of these pictured here and...


here:


Are they creepy enough?? ;) No? ok, how about this...

I seeeee youuuuuuuuuuu

I was so loved and played with, I have holes in my body!! :(

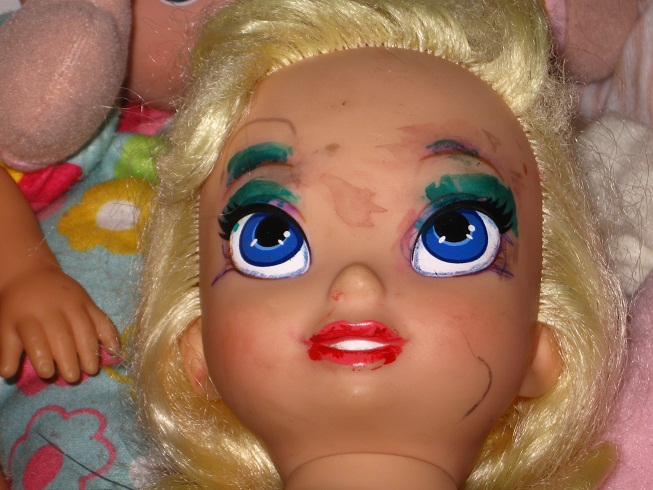
Glamour shots...


Mommy liked putting makeup on me...only, it wasn't really makeup, and I can't get it off now.. I feel like such a dirty whore..... :'( *sniff sniff*

You're going to do WHAT to us?!?! Noooooooooooooooooooo................
Not sure why, but I think it's weird that most of the dolls I've seen and got have blue eyes... Either way, their vacant stares are a little creepy sometimes and the ones with holes in their mouths for pacifiers...I am trying to figure out what I can do to utilize that and make it creepy...
One of usssss.........


I have no idea about this doll... This 'thing' was around its neck and I was able to just about wrap it inside like I was coddling it? Trying to think if I could use that or not...
This little girl is interesting. Not only is she frowning and looks sad, but she has one green and one blue eye! not sure if that's just age or if she came that way...the sad thing really weirds me out though, don't think I've ever seen that.


Yeahhh..... this is a hair clip hair extension... thing. I couldn't resist getting it, but now have to figure out how to use it!


Next, we have a lamp I was EXTREMELY excited to have found!!


Insert creepy old guy type slow laugh here ;)


The lamp shade is sufficiently dirty, grungy and worn. This will need little work to get creepy-fied!!


Not many non-doll items I got, but the lamp and these things are the only Halloween non-dolls stuff I got. That's 4 packages of webbing, unopened, a black roll of crepe paper, a posable spider, bag of plastic pumpkin votive holders or whatever, a plastic/styrofoamy skull that has a battery slot in the bottom and not sure what it does.. and then another mask, of course!


Past the Halloween stuff, I found 2 sewing machines that they priced at $10 a piece!! I took a gamble and chose only one but am so excited I got home, plugged it in (yes! the pedal/plug was with it!!) and IT WORKS!!! The light bulb is good and the pedal moves the needle!!! I can't wait to get this to Airon after we figure out how to thread the darn thing.... lol


Most of what Adeana got was clothes and a bit of Christmas decorations (we found an entire popcorn tin full of red plastic ball ornaments, 3 or 4 patterns on them!!) . She did however find something that well, excited her because she knew what it was or could be,.. I had to be told :p


Yup! She found an honest to goodness Hermes scarf!! It was in pretty good condition too! I maybe found one tiny little red kool-aid type of stain, but I think that may have been it!

See, the especially cool thing about Blue Hanger is that they only price certain things (like the sewing machine and furniture, anything that's over about 7 or so pounds) and the rest is priced BY THE POUND!!

That's right! Because of this, my entire haul was only $60!!!! $50 was about my limit for Halloween related supplies/props so I did perfect!

We were so pleased with ourselves and our finds and so excited, we decided to hit up a local place called Red's Porch for a couple of cold, delicious beers and some grub. I got a sort of egg, bacon and salsa burrito and Adeana got some chicken and waffles, the waffles were especially DELISH!!


That was definitely a good day to hang with a friend, to find some awesome deals and especially for a good bite and cold beer. I can't wait to get started on dirtying up and creepifying these dolls for ya'll to see. I think I may have even decided on doing a main theme for my house decorations as well as ideas to do for it!

Craft ya laters!!