Sections

Monday, January 14, 2013

Skinner Blend Method - Pink, white, blue and silver

Previously on Artfire: Published On: 07-16-2012


I have had my pasta machine for playing with clay for about as long as I've had all my clay but had yet to properly do the Skinner Blend method to get a really good color shift going...until yesterday!

6441
Colors used : pink, blue and white

6442
This is after about 7 or 8 runs through the pasta machine.

6443
This is after about 15 or so runs through the pasta machine.

644664456444
All done!!!

I brought out all my cutters and wanted to do a good variety of shapes:

6447
6448
6450

The 2 ovals missing were pieces that stuck in the cutter at first so I set them aside on my silicone baking mat.

As you can see, I did a good deal of cutting, as well as using my zig-zag blade and getting a few strips in the middle.

6452

Look at all the awesome pieces I got!!! Most were from the original strip of blended clay, but a few I got from using silver with glitter as a base (for the broken hearts and the circles with swapped flower inserts) and then I used the silver for its own pieces bc it got a little blue and pink on the edges and when I ran through the pasta machine to ready for more backs, I saw the pink and blue stripes in there and couldn't resist them being their own pieces!

The butterflies on the bottom left as well as the squares were used with the silver base and broken pieces from the original rollout and pieces of the zig-zag cuts I'd made and then rolled into the silver using the pasta machine.

The top left section has a few free-form cuts I made just to see what they'd look like.

6453
Junk pieces on silver.
6454
Swapped flower inserts.
6459
Friendship heart necklace pendants.6458
Ice cream cones and free-form.6457
More free-form.6456
Totally outrageous Jem earring pieces? ;)
6460

Regular cuttings.6455
Kind of weathered looking pieces I might put floating sand/beach related floaters in under resin coating?

I can't wait to get some of these framed/sealed in resin, some maybe with a layer of filler as if they were in a bezel!!

Accidental Camo Clay Pendants

Previously on Artfire: Published On: 07-16-2012


I was perusing Pinterest and a ton of craft sites and blogs this past weekend and came across an awesome blog for a woman that does a lot of nifty things with clay and gave me an awesome inspiration to try something: a mica shift.

You can find her original blog and the particular post I'm referring to over here at :

Mica shift con estrellas : www.fimoland.com

Basically "Mica shift with stars" and with her pictures taken so well to demonstrate the technique along with my basic understanding of Spanish (I did take 5 years in school after all!), I was able to get the general idea of how she did it,... I think. Next time I should try with the powders that give you that mica shift effect properly.

Unfortunately, I think I should have actually used clay colors more like what she did, with the mica powders and/or shinier colors than what I have; which are drab, basic colors.

I got my colors out and conditioned them, ran them through my pasta machine at about setting 4 or 5 with the brown at level 9 as it was my base layer:

6417

I then used my star cutters to get a few medium stars for each color (black, dark green and a maroon I made by mixing red and black) as well as a bunch of smaller stars in each color.

I didn't take the in-between step picture (sorry!) but I laid out the stars on the brown, overlapping each other here and there and proceeded to run the sheet through the pasta machine about 10-15 times to get them imbedded in the brown like  you see here. I then took 2 different sized oval cutters and started in on my sheet:

6418

Once I figured I got as many as possible that would look good, I went ahead and laid them out to the side:

6419

I realized at about this point, they weren't really looking like the mica shift pattern I'd been aiming for, but were now camo looking pendants! This just means that I'll be able to make a set of them (or even two, there's a lot!) and get them up on the site later.I then used the background clay to go through the machine again as it was just the brown and had hints of the other colors. After running through the machine, I saw that the brown had little bits of black that ended up looking sort of woodgrain! I cut out a number of small ovals and balled up the background clay from that. I ran it through the pasta machine another time with that bit and got the results you see below for the final count:

6420

They went in the oven and I now have 8 large oval pendants, 24 small camo, 28 thicker brown with black woodgrain effect and 1 small green/black swirl from the leftover clay. One of these days I''' try to seal them in resin or varnish, or whatever it is you're supposed to use on clay.

New ideas, new upcoming projects, new inspiration!!

Previously on Artfire: Published On: 06-29-2012

So I've been gone for a bit because I was working 2 jobs, but I quit that one about a couple months ago and since then, have just basically been settling in to the new house we moved in to in March, but also have been incredibly busy at the day job! Thankfully however, we have internet access and in my minutes here and there, I have found inspiration to start crafting again and MAKE the time at home to do stuff!!

I have started a pinterest account and through this, I have found lots of awesome ideas, and I continue to find awesome things each time I go on, but have also posted a lot of ideas for things I would like to try and have even tried a few already!!

Here are a few of the things I've come up with and will be aiding in my immediate future projects/items. Please forgive the poor photo quality, I have had issues with my digital camera capturing the colors just right and/or have used my camera phone just to get these up for you guys:

61266125
These are done with shades of purple in an ombre-style painting, then stenciled on the black rose, first one has silver paint to accent (I accidentally used a little too much black paint and it seeped under the edges of the stencil, honest 1st-time type of mistake) so for the second one, I didn't use as much paint and then just sprinkled a little purple glitter over in a few spots and it was much better!
 6124
This one I painted a 2-tone background, a wooden table with a pink tablecloth draped on it at an angle and a blue pearly vase and attached silk flowers to look like a flower vase on the hall table perhaps.
6123
This one was just the blue pearly background (love this color!!), brown tree branch painted on and then the white silk flowers were glued on to look like a cherry blossom tree in full bloom on a beautiful spring morning!
6127
For this one, I painted thick stripes of red and a dark orange as the background, if I'd had a stencil I would have used it but unfortunately for the leaves, I cut these out by hand out of card-stock and then laid it down and sponged around with the gold to have the imprint show of the background.

All the canvases above were painted using acrylic paint and 3"x3" canvases and then sprayed with a gloss varnish-type spray to seal in the paint and to give the awesome extra gloss look.

Yes, believe it or not, these are all only 3"x3" canvases!! I have gotten 24 of these little guys and am having a blast with testing out techniques on them!! This has been a good way to make sure that before I get to a larger, more permanent canvas, I am less likely to make a big mistake and if I do make one, it'll be less severe just as I have a basic idea of what to do.


You should be able to find the blank canvases in a 6-pack at Hobby Lobby for about US $5.00; I haven't found an online supplier yet as I was really anxious to get these the day I wanted to play!!

Next I will post a couple of resin pieces/projects I've done/am working on!!

Sunday, January 13, 2013

Loom Knitting - Jan 2013 Monthly Challenge


The Challenge for January, as the title states, is loom knitting. Loom knitting is a way to make things with a loom that you would otherwise crochet or knit with hooks or needles, only, on a loom! Duh, right? Well, anyways, my bff was working on a scarf right before New Years and I saw and was immediately intrigued! I asked what she was doing, and if she could teach me!!

The funny thing is, I've been doing something similar for years, only not in such a large scale or as nice. The other funny thing? You guys have already seen what that particular form is!:


Simple finger weaving I did to make Halloween garland decorations.


Some of the Christmas garland I made and put up around the fireplace, over the valance/curtains and under the bar like I did for Halloween. I got the yarn that changes color between red, white and green, and had the silver tinsley type pieces in there.
 As soon as my bff showed me how to do it, why, I went straight to my local Joanns, coupons in hand, and purchased 2 skeins of a super soft, gorgeous teal colored yarn and a 10" straight loom. She got me started and over the weekend, I made this:

It's such a simple thing, making a loom knit scarf. The 2nd picture shows what the weave looks like when stretched out, but bc the weave is so loose (due to my plastic loom having far set pegs), it most of the time rolls in on itself on the sides. That's ok though, because this wonderful 13 foot long scarf when worn, makes me just wanna curl up in it it's soooo soft!!

The next one I made was the same pattern, only, I added fringe this time! Once you realize where to put it, in between the rows at the ends, it's not that hard. The hardest part is getting them trimmed about the same length. I made it for a friend at work and she LOVES it! That's definitely a job well done I'd say!!
  
The next one I did, was for a guy friend in our group that fell in love with the idea of having a scarf custom-made when he saw mine over New Years and said that he would really really like one in a green that matches our friend's motorcycle. I did the same pattern as the previous two, only, a type of doubled wrap. The wrap just skips pegs and when you do a full row, covering all the pegs, it somehow makes the scarf look like it's 2 layered! Amazing!!:

I really liked how that doubled up look turned out so I went another step up and wanted to do 2 colors at the same time!! It started looking pretty neat:

However, things turned way sour when the tightness of the 2 strands of yarn made the looping around the pegs a little too tight:

As soon as I heard that snap and realized what happened, I almost started tearing up!! NOOOO!!! I couldn't believe I just did that!!! Mannn.... that meant I had to go back to Joanns and get another loom! :( But that's ok, I ended up getting more yarn anyways as their sales and coupons were still going pretty good for the New Year!!

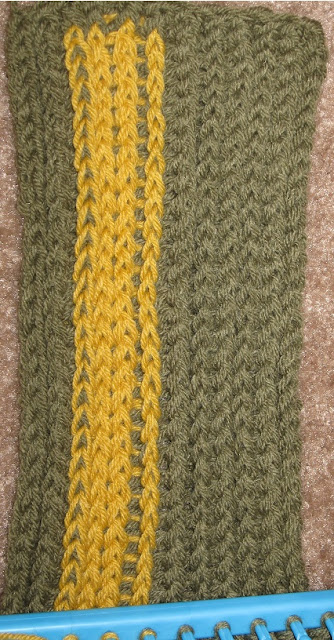
The next scarf I started, I used the suggestion from the friend that got the green one earlier. He stated that the owner of the motorcycle we matched to wanted one also! Only, he wanted a gold stripe in his, not centered. I tried about 3 times and on the 3rd time finally decided on a way to make this scarf:


I had looked up different ways to add a vertical stripe online and on YouTube, however, I ended up just figuring it out myself the way I wanted to wrap and the above picture shows the weave I decided on. What you can't really tell, is that where the gold stripe is, there was a doubling up so that it was thicker than the rest of the green part. The way I fixed this was wrapping the gold around the 4 sets of pegs, then doubling back on the middle 2. Then I wrapped the top 2 sets of pegs green, went around the first and last set of gold pegs to overlap (so as to mic the 2 colors into the pattern and not create a gap the whole way down) and wrapped down, back up and skipped over the gold pegs on the way back. Then before tucking over to create the row, I wrapped the green a whole row again. Once I finished this 2-layered row, I was done and would proceed to loop over the pegs to finish the row. 

Once I finish with the whole scarf, I can post a how-to if anyone's interested in seeing exactly how I did it, with picture step-by-steps. Also, I have not been approached by this friend, and as far as I know, he doesn't even know I'm making this for him! I can't wait to see the look on his face!

Once I get these 2 scarves done, I have another 1 planned to make for one of the managers at my office (an exact match to the 2nd scarf with fringe), and then the colors/yarn/ideas for about 5-6 more scarves. If I make all of these, it will add up to 11-12 total scarves which would fulfill my January Challenge!! Stay tuned!!

Friday, January 11, 2013

The Monthly Craft Challenge!!

I've seen this type of idea on other people's blogs where they have a weekly or a monthly challenge that they invite others to join in on. This can include people that already have those supplies, or maybe have to go out and get supplies so they can participate.

For me, I already have a ton of supplies just not getting used. I feel more like a Jackie of all trades, master of none. My goals in doing this challenge is to attempt to become more of a master at the crafts and hobbies I have delved in. My supplies currently are stored away in their boxes or drawers, wasting away, and that just makes me sad! The following should give you an idea of what all I have: 

Clay - clay, pasta roller, blades, carving tools, toaster oven, bead baking rack with pins, pearl ex powders, cutters:

Resin - clear resin (2pks), white resin (1 pk), tons of glitter, mylar flakes, transparent and opaque color dyes, molds, mold release


Candles - double boiler, thermometer, 3 color dyes, 6-pk scents, wicks, 10lb slab of wax, stearic acid, vybar:


Beads - seed, large seed, bicones, wood, glass, crystals, shells, cubes, colored wires, fireline thread, memory wire, jump rings, head/eye pins, earring hooks, clasps:

Scrapbooking - stickers, more stickers, gel pens, stamps, 4 pairs of edging scissors, mod podge glue, mod podge dimensional magic(to compare to resin), papers (singles and pads), ribbon:

Embossing - powders, resist ink, embossing ink pad, heat gun


Sewing and String Crafts - yarn, embroidery thread, spools, needles, crochet hooks, sewing machine, tons of fabric, patterns:


This isn't even all of the supplies I have, but it is a majority. I've been collecting supplies, as well as hobbies to go along with them, since before I was in High School. As such, I've clearly amassed a collection worthy of 5 crafters at least!

To try and whittle this stock of supplies down into actual items, I will attempt to challenge myself monthly with making things using the supplies I currently have, with only buying new things if it's something like more sewing thread mid-purse, or more yarn to finish the latch hook I'm doing, etc.

I'd like to try and do this all year,
but let's see how long I can keep this up. Is there anyone else out there with a massive supply stock that wants to join me?? Or even if  you don't have a supply list like I do to choose from, is there anyone that wants to challenge themselves to either learn new methods of crafting and use the challenge to hone those skills, or even just get better at skills you already have? Let me know in the comments!

Thursday, January 10, 2013

Happy New Year!! - 2013

Happy New Year everyone!!! It's a new year and that means ... new goals!

I don't usually make New Years resolutions, but I think maybe I should this year. I've been trying to build up to doing so many things that I feel if I just lay them out, then it'll be easier to go along with them. That'll totally work, right?? Most of my goals this year actually have to do with my jewelry/crafts/business. There are maybe a few that aren't, but most are definitely geared towards getting my butt in gear about my crafts and jewelry.

First things first: Clean that craft room!!

**WARNING!! - Things in the following pictures may scare the weak-hearted. Please take caution while viewing....

 Straight ahead, the box that's half open? Yeah, that's my friend's Christmas wreath I'd borrowed and taken down.... I just hadn't quite gotten the box closed yet. The big tubbie it's sitting on would be a mix of mine and my bff's Halloween decorations I never got a chance to put away. The box by the Joanns bag would be kitchen dishes and things to use for Christmas to put food on/in I borrowed/nabbed from my mom.

On the floor, that's the 2nd butterfly punched paint chip art piece I promised you guys last post that I never quite finished.... Then there's the little wooden shelf that I was using to work on some clay pieces one day with a friend before the holidays exploded. My sewing table on the right is right by the door, therefore, has become a sort of catch-all sadly.

This is supposed to be clean enough to do clay and resin on and/or possibly plug my laptop into that monitor to use for references when working on said clay and resin projects.


 And a better idea of the mess that is my sewing table...**siiigh**

So there you have it! My horrible mess of a craft room! This would not do! This is not a space that promotes a healthy, creative mind! I haven't been able to make anything more than simple holiday decorations since maybe Halloween? No wonder I was in such a funk!!

This last weekend, I told myself I would get in there and do what I should have done ages ago and really, shouldn't have to do at all if I'd only learn to pick up regularly.... But on to the half-reveal!!

 This is after about 4-5 hours of solid work picking up, re-arranging, cleaning, etc on Saturday. (Hey look! There IS a floor!! OMG!)
A nice view of the 2 new Sterilite drawers I got. I was lucky enough to find the same kind as I already had before. I use these for a majority of my non-fabric craft supplies and this is before I'd decided what to fill the other half of the drawers, but I'll highlight those in a bit.

I spent another 4-5 hours in my room on Sunday but I was unable to finish everything sadly. I did however get about 90% done and now my craft room looks like this!:


 TA-DAAAA!!!!! Doesn't this look MUCH better?? **nod nod nod** I am kinda proud of myself, but the sad reality is it should never have gotten this bad in the first place! I had a pretty good idea of how I wanted things arranged which is why I already had the drawers I did, and the hardware drawers above my sewing table house my beads and basic jewelry making supplies. The pegboard was built by my loving boyfriend and is fantastic since before, I only had those on my desk taking up space, or even on the floor! :(


My room isn't 100% yet, but this is where I left off Sunday night.

Since I've recently gotten into making loom knitted scarves, I had to store my yarn in a safe, clean place so I bought one of those hanging shoe organizers and I love it! It even has a little side pocket on the top 2 shelves that I can put my tools in!!

 These are my loverly Sterilite drawers and I love them!!! I also love my label-maker. It is the most awesomest of awesome tools!! I have labeled the drawers as to what is in them, and all that's really left to clean are the stragglers. The last few things that you can never really determine where they need to go, are always the last to go somewhere!! My goal in this is to make sure they don't just get shoved somewhere, but are actually organized and put away with like items where I can easily locate them later.

You may ask why I showed you all this. You may ask, "Aren't I embarrassed by all this?!" Simple answer is: yes. I am extremely embarrassed by this. I've never been a spotless kinda gal, even when I was young I had trouble keeping my room clean. But with as many crafts and supplies, you have to understand.... it's just plain HARD!! 

This brings me to my goals/resolutions, and if any of you have similar problems, these could be for you as well?

- KEEP ORGANIZED!! - This may be hard, but it's necessary! Goal = monthly spot checks through my craft room to make sure that I have given myself ample resources to keep my crafts organized, and make sure I do a sweep to make sure everything is in its place

- CRAFT OFTEN - This should be fairly easy, but I have sub-goals to help myself along the way = 
         - Monthly craft challenge - to be explained in next post ;)
         - Keep up with holidays, and try to make things relevant to them at least 3+ months ahead of time. This can't start yet, but maybe 4th of July things could be first?
         - Determine a certain number of things I want to add new to my Artfire store, BeadsbyCelleste every month so that I have fresh stock and attempt to make new sales.

- FINISH PROJECTS I START! - This is definitely something I have a big problem with! I start things, and once I get as far as realizing I pretty much have the procedure down, there's a good chance I drop the task and go on to something new! Goal = monthly checks on what I haven't finished, and make a conscious effort to finish as many, if not all, of these projects. I think maybe even designating a certain area in my room that I could put these projects so I can maybe go straight there and see what needs to be finished. This is definitely inclusive of all the curtains I promised my mom years ago as well as finishing the curtains I started for my brother (along with pillowcases for throw pillows for living room). 

- BLOG MORE - I really want to start keeping up with this thing better and I want to get so good at updating that you guys can actually expect a post schedule!! Wouldn't that be fantastic! :p

There are probably a few more things I should add to this list, but I think this is good enough to start with. I may add anything else later...

I'll catch you guys later!